第一个例子 Hello World
首先介绍一下如果将 Guice 和 RoboGuice 的库添加到项目中。
- 下载 RoboGuice 和 guice-2.0-no_aop.jar(not guice-3.0), 或者下载
- 创建一个新 Android 项目,比如 GuiceDemo,目标平台 Android1.5 以上。
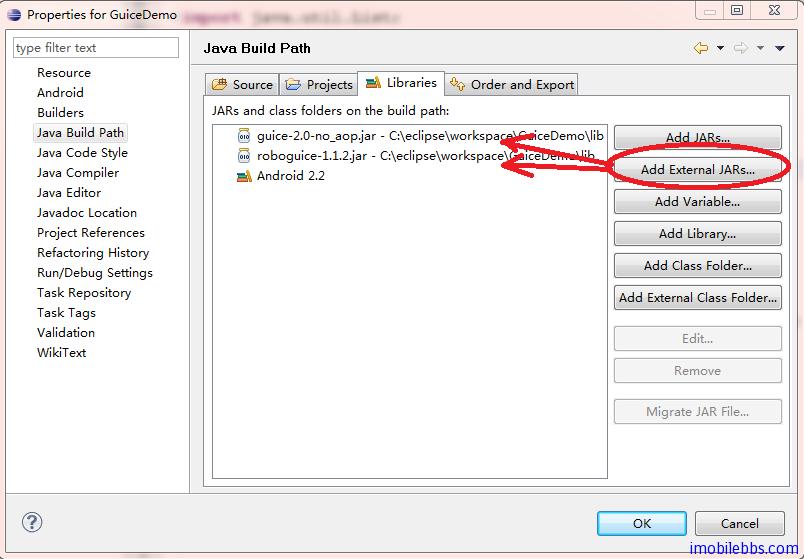
- 一般可以在该项目下添加一个 lib 目录,将两个 jar 文件拷到 lib目录下,然后通过: Project > Properties > Java Build Path > Libraries > Add External JARs
添加了对应 guice 和 roboguice 库的引用之后,就可以开始编写第一个使用 roboguice 的例子。
使用roboguice 的步骤:
- 创建一个 RoboApplication 的子类 GuiceApplication,GuiceApplication 为 Appliacation 的子类,因此需要修改 AndroidManifest.xml,将 Application 的 name 指向这个类。可以参见 Android 简明开发教程九:创建应用程序框架
<application android:name=”GuiceApplication”
android:icon=”@drawable/icon” android:label=”@string/app_name”>
<activity android:name=”.GuiceDemo”
android:label=”@string/app_name”>
<intent-filter>
<action android:name=”android.intent.action.MAIN” />
<category android:name=”android.intent.category.LAUNCHER” />
</intent-filter>
</activity>

</application>- 在这个简单的例子中,它使用的 Layout 定义如下:
<?xml version=”1.0″ encoding=”utf-8″?>
<LinearLayout xmlns:android=”http://schemas.android.com/apk/res/android”
android:orientation=”vertical”
android:layout_width=”fill_parent”
android:layout_height=”fill_parent”
>
<TextView
android:id=”@+id/hello”
android:layout_width=”fill_parent”
android:layout_height=”wrap_content”
android:text=”@string/hello”
/>
</LinearLayout>
我们定义了一个 TextView ,它的 id 为 hello.
假定这个应用使用一个 IGreetingService ,它有一个方法 getGreeting() 返回一个字元串,至于 IGreetingService 如何实现,GuideDemo 不需要关心。
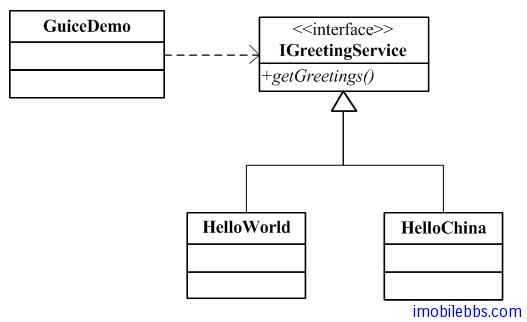
Dependency injection 设计模式的一个核心原则为: Separate behavior from dependency resolution. 也就说将应用需要实现的功能和其所依赖的服务或其它对象分离。 对本例来说 GuiceDemo 只要知道它依赖于 IGreetingService 服务,至于 IGreetingService 有谁实现GuiceDemo 并不需要知道。
在 Roboguice 中使用 @Inject 来表示这种依赖关系。
public class GuiceDemo extends RoboActivity  {

 @InjectView (R.id.hello) TextView helloLabel;
 @Inject IGreetingService greetingServce;

 @Override
 public void onCreate(Bundle savedInstanceState) {
 super.onCreate(savedInstanceState);
 setContentView(R.layout.main);
 helloLabel.setText(greetingServce.getGreetings());
 }
}- 使用 RoboGuice 的 Activity 需要从 RoboActivity 派生 (RoboActivity 为 Activity 的子类).
- 使用 @Inject 标注 greetingServce 依赖于 IGreetingService 服务
- 使用 @InjectView 表示 helloLabel 依赖于 R.id.hello (XML)
代码中没有创建 greetingServce 对象的代码(如 new xxx()) 和为 helloLabel 赋值的代码。这些值都可以 Roboguice 自动创建和赋值注入(Inject) 到变数中。
为了说明问题,我们在代码中添加两个对 getGreetings 的实现,一个为 HelloWorld, 一个为 HelloChina:
public class HelloChina implements IGreetingService{

 @Override
 public String getGreetings() {
 return "Hello,China";
 }

}

public class HelloWorld implements IGreetingService{

 @Override
 public String getGreetings() {
 return "Hello,World";
 }

}- 到这裡,你可能有些困惑,RoboGuice 怎麽知道使用那个类(HelloWorld 或是 HelloChina)为 GuiceDemo 中的 greetingServce 赋值呢?这是通过在 Module 中定义 binding 来实现的。
项目中添加一个 GreetingModule (从 AbstractAndroidModule 派生)重载 configure 方法:
public class GreetingModule extends AbstractAndroidModule{

@Override
protected void configure() {
bind(IGreetingService.class).to(HelloWorld.class);
//bind(IGreetingService.class).to(HelloChina.class);

}

}
将 IGreetingService 绑定到 HelloWorld 类。
然后在 GuiceApplication 的 addApplicationModules 添加上述模块:
public class GuiceApplication extends RoboApplication {

 protected void addApplicationModules(List<Module> modules) {
 modules.add(new GreetingModule());
 }

}
可以将 GreetingModule 绑定改为 HelloChina ,对比一下:

通过改变 binding ,GuiceDemo 显示了不同的结果,GuiceDemo 不依赖于具体的实现,可以非常方便的改变介面的实现而无需更改 GuiceDemo的代码。大大降低了类于类之间的藕合性。
后面将逐个介绍 Guice 和 RoboGuice 支持的 Binding 类型和用法(Guice) 以及与 android 平台相关的 Dependency injection (RoboGuice)