Android 实战简易教程-第四枪(ScrollView 和 HorizontalScrollView 动态添加控件并提供事件监听)
一、ScrollView
由于手机屏幕的高度有限,在面对组件要显示多组信息时,ScrollView 视图(滚动视图)可以有效的安排这些组件,浏览时可以自动的进行滚屏的操作。
ScrollView 视图的定义格式如下:
<?xml version="1.0" encoding="utf-8"?>
<ScrollView
xmlns:android="http://schemas.android.com/apk/res/android"
android:layout_width="fill_parent"
android:layout_height="fill_parent"
android:id="@+id/myscroll">
<LinearLayout
android:layout_width="fill_parent"
android:layout_height="wrap_content"
android:orientation="vertical"
android:id="@+id/mylinear" >
</LinearLayout>
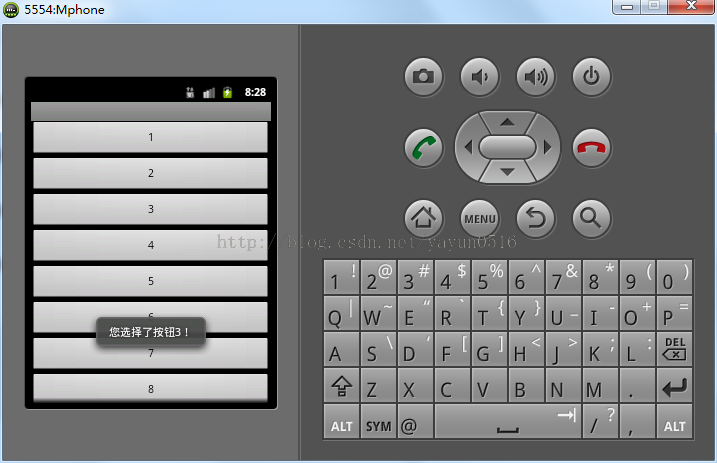
</ScrollView>这里需要注意的是:滚动视图的使用形式和各个布局管理器的操作形式类似,唯一不同的是所有的布局管理器中均可以包含多个组件,而滚动视图中只能有一个组件。否则会报错,可以自行测试!
下面看一下 MainActivity 程序:
package org.lxh.demo;

import android.app.Activity;
import android.os.Bundle;
import android.view.View;
import android.view.ViewGroup;
import android.view.View.OnClickListener;
import android.widget.Button;
import android.widget.LinearLayout;
import android.widget.Toast;

public class Hello extends Activity {
    String str[] = { "1", "2", "3", "4", "5", "6", "7", "8", };

    public void onCreate(Bundle savedInstanceState) {
        super.onCreate(savedInstanceState); // 生命周期方法
        super.setContentView(R.layout.main); // 设置要使用的布局管理器
        LinearLayout linear = (LinearLayout) super.findViewById(R.id.mylinear);// 取得组件
        LinearLayout.LayoutParams param = new LinearLayout.LayoutParams(
                ViewGroup.LayoutParams.FILL_PARENT,
                ViewGroup.LayoutParams.WRAP_CONTENT);// 定义按钮的布局参数
        for (int i = 0; i < this.str.length; i++) {
            Button btn = new Button(this);// 创建按钮组件
            btn.setText(this.str[i]);// 设置文本
            btn.setId(i);
            linear.addView(btn, param);// 增加组件
            btn.setOnClickListener(new OnClickListenerImpl());

        }

    }

    private class OnClickListenerImpl implements OnClickListener {

        public void onClick(View v) {
            switch (v.getId()) {
            case 0:
                Toast.makeText(Hello.this, "您选择了按钮1!", Toast.LENGTH_SHORT)
                        .show();
                break;
            case 1:
                Toast.makeText(Hello.this, "您选择了按钮2!", Toast.LENGTH_SHORT)
                        .show();
                break;
            case 2:
                Toast.makeText(Hello.this, "您选择了按钮3!", Toast.LENGTH_SHORT)
                        .show();
                break;
            case 3:
                Toast.makeText(Hello.this, "您选择了按钮4!", Toast.LENGTH_SHORT)
                        .show();
                break;
            case 4:
                Toast.makeText(Hello.this, "您选择了按钮5!", Toast.LENGTH_SHORT)
                        .show();
                break;
            case 5:
                Toast.makeText(Hello.this, "您选择了按钮6!", Toast.LENGTH_SHORT)
                        .show();
                break;
            case 6:
                Toast.makeText(Hello.this, "您选择了按钮7!", Toast.LENGTH_SHORT)
                        .show();
                break;
            case 7:
                Toast.makeText(Hello.this, "您选择了按钮8!", Toast.LENGTH_SHORT)
                        .show();
                break;
            case 8:
                Toast.makeText(Hello.this, "您选择了按钮8!", Toast.LENGTH_SHORT)
                        .show();
                break;

            default:
                break;
            }

        }

    }
}
运行实例:
二、HorizontalScrollView
首先定义主布局文件 main.xml
<LinearLayout xmlns:android="http://schemas.android.com/apk/res/android"
    xmlns:tools="http://schemas.android.com/tools"
    android:layout_width="match_parent"
    android:layout_height="match_parent" >

    <HorizontalScrollView
        android:layout_width="wrap_content"
        android:layout_height="150dp"
        android:layout_gravity="center_vertical"
        android:background="#AA444444"
        android:scrollbars="none" >

        <LinearLayout
            android:id="@+id/id_gallery"
            android:layout_width="wrap_content"
            android:layout_height="wrap_content"
            android:layout_gravity="center_vertical"
            android:orientation="horizontal"
            android:scrollbars="horizontal" >
        </LinearLayout>
    </HorizontalScrollView>

</LinearLayout>
然后定义 activity_index_gallery_item.xml
<?xml version="1.0" encoding="utf-8"?>
<RelativeLayout xmlns:android="http://schemas.android.com/apk/res/android"
    android:layout_width="120dp"
    android:layout_height="130dp"
    android:background="@android:color/white" >

    <ImageView
        android:id="@+id/id_index_gallery_item_image"
        android:layout_width="80dp"
        android:layout_height="80dp"
        android:layout_alignParentTop="true"
        android:layout_centerHorizontal="true"
        android:layout_margin="5dp"
        android:scaleType="centerCrop" />

    <TextView
        android:id="@+id/id_index_gallery_item_text"
        android:layout_width="wrap_content"
        android:layout_height="wrap_content"
        android:layout_below="@id/id_index_gallery_item_image"
        android:layout_centerHorizontal="true"
        android:layout_marginBottom="5dp"
        android:layout_marginTop="5dp"
        android:textColor="#ff0000"
        android:textSize="12dp" />

</RelativeLayout>
MainActivity 程序如下:
package org.yayun.demo;
import android.app.Activity;
import android.os.Bundle;
import android.view.LayoutInflater;
import android.view.View;
import android.view.Window;
import android.view.View.OnClickListener;
import android.widget.ImageView;
import android.widget.LinearLayout;
import android.widget.TextView;
import android.widget.Toast;
public class MainActivity extends Activity {
private LinearLayout mGallery;
private int[] mImgIds;
private LayoutInflater mInflater;
@Override
protected void onCreate(Bundle savedInstanceState) {
super.onCreate(savedInstanceState);
requestWindowFeature(Window.FEATURE_NO_TITLE);
setContentView(R.layout.main);
mInflater = LayoutInflater.from(this);
initData();
initView();
}
private void initData()// 初始化数据
{
mImgIds = new int[] { R.drawable.a, R.drawable.b, R.drawable.c,
R.drawable.d, R.drawable.e, };
}
private void initView()// 填充数据
{
mGallery = (LinearLayout) findViewById(R.id.id_gallery);
for (int i = 0; i < mImgIds.length; i++) {
View view = mInflater.inflate(R.layout.activity_index_gallery_item,// 找到布局文件
mGallery, false);
ImageView img = (ImageView) view
.findViewById(R.id.id_index_gallery_item_image);// 找到图片控件
img.setImageResource(mImgIds[i]);
img.setId(i);
img.setOnClickListener(new OnClickListenerImpl());
TextView txt = (TextView) view
.findViewById(R.id.id_index_gallery_item_text);
txt.setText("some info ");
mGallery.addView(view);
}
}
private class OnClickListenerImpl implements OnClickListener{
public void onClick(View v) {
switch (v.getId()) {
case 0:
Toast.makeText(MainActivity.this, "图片a", Toast.LENGTH_SHORT).show();
break;
case 1:
Toast.makeText(MainActivity.this, "图片b", Toast.LENGTH_SHORT).show();
break;
case 2:
Toast.makeText(MainActivity.this, "图片c", Toast.LENGTH_SHORT).show();
break;
case 3:
Toast.makeText(MainActivity.this, "图片d", Toast.LENGTH_SHORT).show();
break;
case 4:
Toast.makeText(MainActivity.this, "图片e", Toast.LENGTH_SHORT).show();
break;
default:
break;
}
}
}
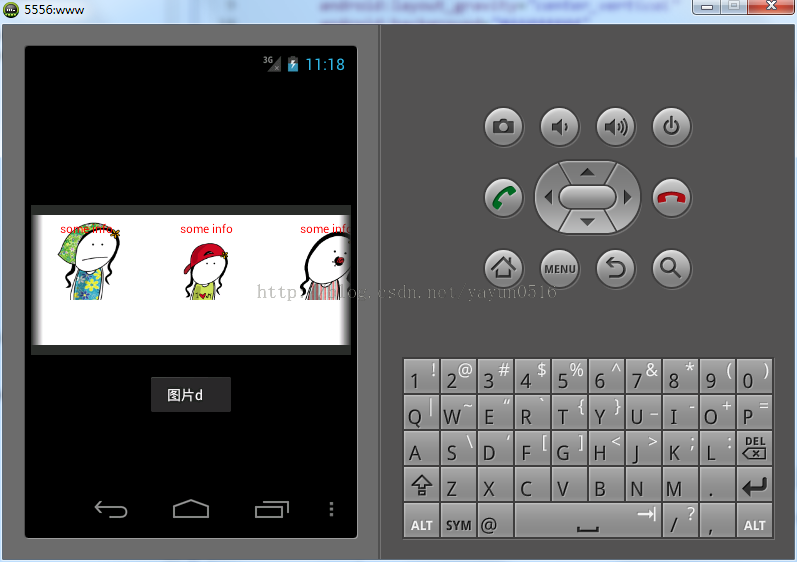
}运行实例如下:
上一篇: Android 实战简易...
下一篇: Android 实战简易...