WebGL 文本 纹理
在上一篇文章中我们学习了在 WebGL 场景中如何使用一个 2D 画布绘制文本。这个技术可以工作且很容易做到,但它有一个限制,即文本不能被其他的 3D 对象遮盖。要做到这一点,我们实际上需要在 WebGL 中绘制文本。
最简单的方法是绘制带有文本的纹理。例如你可以使用 photoshop 或其他绘画程序,来绘制带有文本的一些图像。

然后我们构造一些平面几何并显示它。这实际上是一些游戏中构造所有的文本的方式。例如 Locoroco 只有大约 270 个字符串。它本地化成 17 种语言。我们有一个包含所有语言的 Excel 表和一个脚本,该脚本将启动 Photoshop 并生成纹理,每个纹理都对应一种语言里的一个消息。
当然你也可以在运行时生成纹理。因为在浏览器中 WebGL 是依靠画布 2d api 来帮助生成纹理的。
我们来看上一篇文章的例子,在其中添加一个函数:用文本填补一个 2D 画布。
var textCtx = document.createElement("canvas").getContext("2d");

// Puts text in center of canvas.
function makeTextCanvas(text, width, height) {
  textCtx.canvas.width  = width;
  textCtx.canvas.height = height;
  textCtx.font = "20px monospace";
  textCtx.textAlign = "center";
  textCtx.textBaseline = "middle";
  textCtx.fillStyle = "black";
  textCtx.clearRect(0, 0, textCtx.canvas.width, textCtx.canvas.height);
  textCtx.fillText(text, width / 2, height / 2);
  return textCtx.canvas;
}
现在我们需要在 WebGL 中绘制 2 个不同东西:“F”和文本,我想切换到使用一些前一篇文章中所描述的辅助函数。如果你还不清楚 programInfo,bufferInfo 等,你需要浏览那篇文章。
现在,让我们创建一个“F”和四元组单元。
// Create data for 'F'
var fBufferInfo = primitives.create3DFBufferInfo(gl);
// Create a unit quad for the 'text'
var textBufferInfo = primitives.createPlaneBufferInfo(gl, 1, 1, 1, 1, makeXRotation(Math.PI / 2));
一个四元组单元是一个 1 单元大小的四元组(方形),中心在原点。createPlaneBufferInfo 在 xz 平面创建一个平面。我们通过一个矩阵旋转它,就得到一个 xy 平面四元组单元。
接下来创建 2 个着色器:
// setup GLSL programs
var fProgramInfo = createProgramInfo(gl, ["3d-vertex-shader", "3d-fragment-shader"]);
var textProgramInfo = createProgramInfo(gl, ["text-vertex-shader", "text-fragment-shader"]);
创建我们的文本纹理:
// create text texture.
var textCanvas = makeTextCanvas("Hello!", 100, 26);
var textWidth  = textCanvas.width;
var textHeight = textCanvas.height;
var textTex = gl.createTexture();
gl.bindTexture(gl.TEXTURE_2D, textTex);
gl.texImage2D(gl.TEXTURE_2D, 0, gl.RGBA, gl.RGBA, gl.UNSIGNED_BYTE, textCanvas);
// make sure we can render it even if it's not a power of 2
gl.texParameteri(gl.TEXTURE_2D, gl.TEXTURE_MIN_FILTER, gl.LINEAR);
gl.texParameteri(gl.TEXTURE_2D, gl.TEXTURE_WRAP_S, gl.CLAMP_TO_EDGE);
gl.texParameteri(gl.TEXTURE_2D, gl.TEXTURE_WRAP_T, gl.CLAMP_TO_EDGE);
为“F”和文本设置 uniforms:
var fUniforms = {
  u_matrix: makeIdentity(),
};

var textUniforms = {
  u_matrix: makeIdentity(),
  u_texture: textTex,
};
当我们计算 F 的矩阵时,保存 F 的矩阵视图:
var matrix = makeIdentity();
matrix = matrixMultiply(matrix, preTranslationMatrix);
matrix = matrixMultiply(matrix, scaleMatrix);
matrix = matrixMultiply(matrix, rotationZMatrix);
matrix = matrixMultiply(matrix, rotationYMatrix);
matrix = matrixMultiply(matrix, rotationXMatrix);
matrix = matrixMultiply(matrix, translationMatrix);
matrix = matrixMultiply(matrix, viewMatrix);
var fViewMatrix = copyMatrix(matrix);  // remember the view matrix for the text
matrix = matrixMultiply(matrix, projectionMatrix);
像这样绘制 F:
gl.useProgram(fProgramInfo.program);

setBuffersAndAttributes(gl, fProgramInfo.attribSetters, fBufferInfo);

copyMatrix(matrix, fUniforms.u_matrix);
setUniforms(fProgramInfo.uniformSetters, fUniforms);

// Draw the geometry.
gl.drawElements(gl.TRIANGLES, fBufferInfo.numElements, gl.UNSIGNED_SHORT, 0);
文本中我们只需要知道 F 的原点位置,我们还需要测量和单元四元组相匹配的纹理尺寸。最后,我们需要多种投影矩阵。
// scale the F to the size we need it.
// use just the view position of the 'F' for the text
var textMatrix = makeIdentity();
textMatrix = matrixMultiply(textMatrix, makeScale(textWidth, textHeight, 1));
textMatrix = matrixMultiply(
textMatrix,
makeTranslation(fViewMatrix[12], fViewMatrix[13], fViewMatrix[14]));
textMatrix = matrixMultiply(textMatrix, projectionMatrix);
然后渲染文本
// setup to draw the text.
gl.useProgram(textProgramInfo.program);

setBuffersAndAttributes(gl, textProgramInfo.attribSetters, textBufferInfo);

copyMatrix(textMatrix, textUniforms.u_matrix);
setUniforms(textProgramInfo.uniformSetters, textUniforms);

// Draw the text.
gl.drawElements(gl.TRIANGLES, textBufferInfo.numElements, gl.UNSIGNED_SHORT, 0);
即:
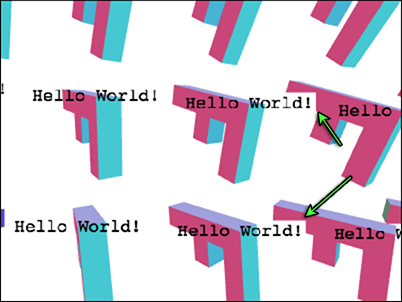
你会发现有时候我们文本的一部分遮盖了我们 Fs 的一部分。这是因为我们绘制一个四元组。画布的默认颜色是透明的黑色(0,0,0,0)和我们在四元组中使用这种颜色绘制。我们也可以混合像素。
gl.enable(gl.BLEND);
gl.blendFunc(gl.SRC_ALPHA, gl.ONE_MINUS_SRC_ALPHA);
根据混合函数,将源像素(这个颜色取自片段着色器)和 目的像素(画布颜色)结合在一起。在混合函数中,我们为源像素设置:SRC_ALPHA,为目的像素设置:ONE_MINUS_SRC_ALPHA。
result = dest * (1 - src_alpha) + src * src_alpha举个例子,如果目的像素是绿色的 0,1,0,1 和源像素是红色的 1,0,0,1,如下:
src = [1, 0, 0, 1]
dst = [0, 1, 0, 1]
src_alpha = src[3]  // this is 1
result = dst * (1 - src_alpha) + src * src_alpha

// which is the same as
result = dst * 0 + src * 1

// which is the same as
result = src
对于纹理的部分内容,使用透明的黑色 0,0,0,0
src = [0, 0, 0, 0]
dst = [0, 1, 0, 1]
src_alpha = src[3]  // this is 0
result = dst * (1 - src_alpha) + src * src_alpha

// which is the same as
result = dst * 1 + src * 0

// which is the same as
result = dst
这是启用了混合的结果。
你可以看到尽管它还不完美,但它已经更好了。如果你仔细看,有时能看到这个问题

发生什么事情了?我们正在绘制一个 F 然后是它的文本,然后下一个 F 的重复文本。所以当我们绘制文本时,我们仍然需要一个深度缓冲,即使混合了一些像素来保持背景颜色,深度缓冲仍然需要更新。当我们绘制下一个 F,如果 F 的部分是之前绘制文本的一些像素,他们就不会再绘制。
我们刚刚遇到的最困难的问题之一,在 GPU 上渲染 3D。透明度也存在问题。
针对几乎所有透明呈现问题,最常见的解决方案是先画出所有不透明的东西,之后,按中心距的排序,绘制所有的透明的东西,中心距的排序是在深度缓冲测试开启但深度缓冲更新关闭的情况下得出的。
让我们先单独绘制透明材料(文本)中不透明材料(Fs)的部分。首先,我们要声明一些来记录文本的位置。
var textPositions = [];在循环中渲染记录位置的 Fs
matrix = matrixMultiply(matrix, viewMatrix);
var fViewMatrix = copyMatrix(matrix);  // remember the view matrix for the text
textPositions.push([matrix[12], matrix[13], matrix[14]]);  // remember the position for the text
在我们绘制 “F”s之前,我们禁用混合并打开写深度缓冲
gl.disable(gl.BLEND);
gl.depthMask(true);
绘制文本时,我们将打开混合并关掉写作深度缓冲
gl.enable(gl.BLEND);
gl.blendFunc(gl.SRC_ALPHA, gl.ONE_MINUS_SRC_ALPHA);
gl.depthMask(false);
然后在我们保存的所有位置绘制文本
textPositions.forEach(function(pos) {
  // draw the text
  // scale the F to the size we need it.
  // use just the position of the 'F' for the text
  var textMatrix = makeIdentity();
  textMatrix = matrixMultiply(textMatrix, makeScale(textWidth, textHeight, 1));
  textMatrix = matrixMultiply(textMatrix, makeTranslation(pos[0], pos[1], pos[2]));
  textMatrix = matrixMultiply(textMatrix, projectionMatrix);

  // setup to draw the text.
  gl.useProgram(textProgramInfo.program);

  setBuffersAndAttributes(gl, textProgramInfo.attribSetters, textBufferInfo);

  copyMatrix(textMatrix, textUniforms.u_matrix);
  setUniforms(textProgramInfo.uniformSetters, textUniforms);

  // Draw the text.
  gl.drawElements(gl.TRIANGLES, textBufferInfo.numElements, gl.UNSIGNED_SHORT, 0);
});
现在启动:
请注意我们没有像我上面提到的那样分类。在这种情况下,因为我们绘制大部分是不透明文本,所以即使排序也没有明显差异,所以就省去了这一步骤,节省资源用于其他文章。
另一个问题是文本的“F”总是交叉。实际上这个问题没有一个具体的解决方案。如果你正在构造一个 MMO,希望每个游戏者的文本总是出现在你试图使文本出现的顶部。只需要将之转化为一些单元 +Y,足以确保它总是位于游戏者之上。
你也可以使之向 cameara 移动。在这里我们这样做只是为了好玩。因为 “pos” 是在坐标系中,意味着它是相对于眼(在坐标系中即:0,0,0)。所以如果我们使之标准化,我们可以得到一个单位向量,这个向量的指向是从原点到某一点,我们可以乘一定数值将文本特定数量的单位靠近或远离眼。
// because pos is in view space that means it's a vector from the eye to
// some position. So translate along that vector back toward the eye some distance
var fromEye = normalize(pos);
var amountToMoveTowardEye = 150;  // because the F is 150 units long
var viewX = pos[0] - fromEye[0] * amountToMoveTowardEye;
var viewY = pos[1] - fromEye[1] * amountToMoveTowardEye;
var viewZ = pos[2] - fromEye[2] * amountToMoveTowardEye;

var textMatrix = makeIdentity();
textMatrix = matrixMultiply(textMatrix, makeScale(textWidth, textHeight, 1));
textMatrix = matrixMultiply(textMatrix, makeTranslation(viewX, viewY, viewZ));
textMatrix = matrixMultiply(textMatrix, projectionMatrix);
即:
你还可能会注意到一个字母边缘问题。

这里的问题是 Canvas2D api 只引入了自左乘 alpha 值。当我们上传内容到试图 unpremultiply 的纹理 WebGL,它就不能完全做到,这是因为自左乘 alpha 会失真。
为了解决这个问题,使 WebGL 不会 unpremultiply:
gl.pixelStorei(gl.UNPACK_PREMULTIPLY_ALPHA_WEBGL, true);这告诉 WebGL 支持自左乘 alpha 值到 gl.texImage2D 和 gl.texSubImage2D。如果数据传递给 gl.texImage2D 已经自左乘,就像 canvas2d 数据,那么 WebGL 就可以通过。
我们还需要改变混合函数
gl.blendFunc(gl.SRC_ALPHA, gl.ONE_MINUS_SRC_ALPHA);
gl.blendFunc(gl.ONE, gl.ONE_MINUS_SRC_ALPHA);
老方法是源色乘以 alpha。这是 SRC_ALPHA 意味着什么。但是现在我们的纹理数据已经被乘以其 alpha。这是 premultipled 意味着什么。所以我们不需要 GPU 做乘法。将其设置为 ONE 意味着乘以 1。
边缘现在没有了。
如果你想保持文本在一种固定大小,但仍然正确?那么,如果你还记得透视文章中透视矩阵以 -Z 调整我们的对象使其在距离上更小。所以,我们可以以 -Z 倍数调整以达到我们想要的规模作为补偿。
...
// because pos is in view space that means it's a vector from the eye to
// some position. So translate along that vector back toward the eye some distance
var fromEye = normalize(pos);
var amountToMoveTowardEye = 150;  // because the F is 150 units long
var viewX = pos[0] - fromEye[0] * amountToMoveTowardEye;
var viewY = pos[1] - fromEye[1] * amountToMoveTowardEye;
var viewZ = pos[2] - fromEye[2] * amountToMoveTowardEye;
var desiredTextScale = -1 / gl.canvas.height;  // 1x1 pixels
var scale = viewZ * desiredTextScale;

var textMatrix = makeIdentity();
textMatrix = matrixMultiply(textMatrix, makeScale(textWidth * scale, textHeight * scale, 1));
textMatrix = matrixMultiply(textMatrix, makeTranslation(viewX, viewY, viewZ));
textMatrix = matrixMultiply(textMatrix, projectionMatrix);
...
如果你想在每个 F 中绘制不同文本,你应该为每个 F 构造一个新纹理,为每个 F 更新文本模式。
// create text textures, one for each F
var textTextures = [
  "anna",   // 0
  "colin",  // 1
  "james",  // 2
  "danny",  // 3
  "kalin",  // 4
  "hiro",   // 5
  "eddie",  // 6
  "shu",// 7
  "brian",  // 8
  "tami",   // 9
  "rick",   // 10
  "gene",   // 11
  "natalie",// 12,
  "evan",   // 13,
  "sakura", // 14,
  "kai",// 15,
].map(function(name) {
  var textCanvas = makeTextCanvas(name, 100, 26);
  var textWidth  = textCanvas.width;
  var textHeight = textCanvas.height;
  var textTex = gl.createTexture();
  gl.bindTexture(gl.TEXTURE_2D, textTex);
  gl.texImage2D(gl.TEXTURE_2D, 0, gl.RGBA, gl.RGBA, gl.UNSIGNED_BYTE, textCanvas);
  // make sure we can render it even if it's not a power of 2
  gl.texParameteri(gl.TEXTURE_2D, gl.TEXTURE_MIN_FILTER, gl.LINEAR);
  gl.texParameteri(gl.TEXTURE_2D, gl.TEXTURE_WRAP_S, gl.CLAMP_TO_EDGE);
  gl.texParameteri(gl.TEXTURE_2D, gl.TEXTURE_WRAP_T, gl.CLAMP_TO_EDGE);
  return {
texture: textTex,
width: textWidth,
height: textHeight,
  };
});
然后在呈现时选择一个纹理
textPositions.forEach(function(pos, ndx) {

  +// select a texture
  +var tex = textTextures[ndx];

  // scale the F to the size we need it.
  // use just the position of the 'F' for the text
  var textMatrix = makeIdentity();
  *textMatrix = matrixMultiply(textMatrix, makeScale(tex.width, tex.height, 1));
并在绘制前为纹理设置统一结构
textUniforms.u_texture = tex.texture;我们一直用黑色绘制到画布上的文本。这比用白色呈现文本更有用。然后我们再增加文本的颜色,以便得到我们想要的任何颜色。
首先我们改变文本材质,通过复合一个颜色
varying vec2 v_texcoord;

uniform sampler2D u_texture;
uniform vec4 u_color;

void main() {
   gl_FragColor = texture2D(u_texture, v_texcoord) * u_color;
}
当我们绘制文本到画布上时使用白色
textCtx.fillStyle = "white";然后我们添加一些其他颜色
// colors, 1 for each F
var colors = [
  [0.0, 0.0, 0.0, 1], // 0
  [1.0, 0.0, 0.0, 1], // 1
  [0.0, 1.0, 0.0, 1], // 2
  [1.0, 1.0, 0.0, 1], // 3
  [0.0, 0.0, 1.0, 1], // 4
  [1.0, 0.0, 1.0, 1], // 5
  [0.0, 1.0, 1.0, 1], // 6
  [0.5, 0.5, 0.5, 1], // 7
  [0.5, 0.0, 0.0, 1], // 8
  [0.0, 0.0, 0.0, 1], // 9
  [0.5, 5.0, 0.0, 1], // 10
  [0.0, 5.0, 0.0, 1], // 11
  [0.5, 0.0, 5.0, 1], // 12,
  [0.0, 0.0, 5.0, 1], // 13,
  [0.5, 5.0, 5.0, 1], // 14,
  [0.0, 5.0, 5.0, 1], // 15,
];
在绘制时选择一个颜色
// set color uniform
textUniforms.u_color = colors[ndx];
结果如下:
这个技术实际上是大多数浏览器使用 GPU 加速时的技术。他们用 HTML 的内容和你应用的各种风格生成纹理,只要这些内容没有改变,他们就可以在滚动时再次渲染纹理。当然,如果你一直都在更新那么这技术可能会有点慢,因为重新生成纹理并更新它对于 GPU 来说是一个相对缓慢的操作。