数据和模型
数据库
通过控制器动作方法和视图脚本,建立了 Album 模块,是时候注意到程序中的模型部分了。记住,模型是解决程序核心目的的一部分(也将模型称之为业务规则),在本例中,也是数据处理的一部分。使用 Zend Framework 中的 Zend\Db\TableGateway\TableGateway 类,这个类是用来查找,插入,更新和删除数据库中表记录的。
通过 PHP 的 PDO 驱动,使用 MySQL,创建名为 zf2tutorial 数据库,然后运行 SQL 语句创建一个 album 表,并插入一些数据。
CREATE TABLE album (
   id int(11) NOT NULL auto_increment,
   artist varchar(100) NOT NULL,
   title varchar(100) NOT NULL,
   PRIMARY KEY (id)
 );
 INSERT INTO album (artist, title)
     VALUES  ('The  Military  Wives',  'In  My  Dreams');
 INSERT INTO album (artist, title)
     VALUES  ('Adele',  '21');
 INSERT INTO album (artist, title)
     VALUES  ('Bruce  Springsteen',  'Wrecking Ball (Deluxe)');
 INSERT INTO album (artist, title)
     VALUES  ('Lana  Del  Rey',  'Born  To  Die');
 INSERT INTO album (artist, title)
     VALUES  ('Gotye',  'Making  Mirrors');
(所选择的测试数据是英国亚马逊畅销书的相关信息!)
现在数据库中有了一些数据,可以为其编写一个简单的模型。
模型文件
Zend Framework 没有提供 Zend\Model 控件,因为模型是你的业务逻辑,取决于你想让它如何工作。根据你的需求,这里仍然有很多控件可以供你使用。一种方法是,在你的程序中模型类对应一种实体,然后使用映射器对象来加载和存储实体到数据库。另一种是使用对象关系映射计算,例如 Doctrine 或者 Propel。
在这个教程中,每一个专辑就是一个 Album 对象(或者说是实体),通过使用 Zend\Db\TableGateway\TableGateway 构建一个 AlbumTable 类,然后使用 AlbumTable 构建一个简单的模型。在数据库的表中,Table Data Gateway 的设计模式可以实现数据接口。请注意,虽然 Table Data Gateway 模式在大系统中可能会被限制。但这个也是个诱惑,如果你把数据库访问代码放进控制器的动作方法,Zend\Db\TableGateway\AbstractTableGateway 这个类就会暴露这些代码。请不要这么做!
在 module/Album/src/Album/Model 路径下新建一个 Album.php :
namespace Album\Model;

class Album
{
    public $id;
    public $artist;
    public $title;

    public function exchangeArray($data)
    {
        $this->id     = (!empty($data['id'])) ? $data['id'] : null;
        $this->artist = (!empty($data['artist'])) ? $data['artist'] : null;
        $this->title  = (!empty($data['title'])) ? $data['title'] : null;
    }
}
Album 实体对象是一个简单的 PHP 类。为了与 Zend\Db 的 TableGateway 类一起工作。需要实现 exchangeArray() 方法。这个方法简单地将 data 数组中的数据拷贝到对应实体属性。
下一步,在 module/Album/src/Album/Model 目录下新建 AlbumTable.php,内容如下:
namespace Album\Model;

use Zend\Db\TableGateway\TableGateway;

class AlbumTable
{
    protected $tableGateway;

    public function __construct(TableGateway $tableGateway)
    {
        $this->tableGateway = $tableGateway;
    }

    public function fetchAll()
    {
        $resultSet = $this->tableGateway->select();
        return $resultSet;
    }

    public function getAlbum($id)
    {
        $id  = (int) $id;
        $rowset = $this->tableGateway->select(array('id' => $id));
        $row = $rowset->current();
        if (!$row) {
            throw new \Exception("Could not find row $id");
        }
        return $row;
    }

    public function saveAlbum(Album $album)
    {
        $data = array(
            'artist' => $album->artist,
            'title'  => $album->title,
        );

        $id = (int) $album->id;
        if ($id == 0) {
            $this->tableGateway->insert($data);
        } else {
            if ($this->getAlbum($id)) {
                $this->tableGateway->update($data, array('id' => $id));
            } else {
                throw new \Exception('Album id does not exist');
            }
        }
    }

    public function deleteAlbum($id)
    {
        $this->tableGateway->delete(array('id' => (int) $id));
    }
}
这里做了许多事情。首先,我们在构造函数中设置了保护属性 $tableGateway 为 TableGateway 的实例。我们将使用这个来属性操作数据库的 album 表。
继续创建一些帮助方法,程序会使用 table gateWay 和这个实例。fetchAll() 检索数据库中 albums 表所有的记录,然后将结果返回 ResultSet,getAlbum() 通过 id 检索一个 Album 对象,saveAlbum()要么创建一个新的记录,或更新已经存在记录,deleteAlbum()移除一条记录。这些代码不需要解释的。
使用 ServiceManager 来配置 table gateway 然后注入到 AlbumTable
为了总是使用同一个的 AlbumTable 实例,我们将使用 ServiceManager 来定义如何创建。最容易的是,在模块类中,我们创建一个名为 getServiceConfig() 的方法,它可以被 ModuleManager 自动调用,适用于 ServiceManager。然后,当我们需要它的时候,就可以取回它。
为了配置 ServiceManager,在 ServiceManager 需要的时候,我们提供一个类的名字或者一个工厂(闭包或者回调),来产生实例化的对象。我们通过实现 getServiceConfig() 来提供一个工厂,这个工厂用来创建一个 AlbumTable。添加这个方法到 module/Album 目录下的 Module.php 文件的底部。
namespace Album;

// Add these import statements:
use Album\Model\Album;
use Album\Model\AlbumTable;
use Zend\Db\ResultSet\ResultSet;
use Zend\Db\TableGateway\TableGateway;

class Module
{
    // getAutoloaderConfig() and getConfig() methods here

    // Add this method:
    public function getServiceConfig()
    {
        return array(
            'factories' => array(
                'Album\Model\AlbumTable' =>  function($sm) {
                    $tableGateway = $sm->get('AlbumTableGateway');
                    $table = new AlbumTable($tableGateway);
                    return $table;
                },
                'AlbumTableGateway' => function ($sm) {
                    $dbAdapter = $sm->get('Zend\Db\Adapter\Adapter');
                    $resultSetPrototype = new ResultSet();
                    $resultSetPrototype->setArrayObjectPrototype(new Album());
                    return new TableGateway('album', $dbAdapter, null, $resultSetPrototype);
                },
            ),
        );
    }
}
这个方法返回 factories 的数组,在传递给 ServiceManager 之前,通过 ModuleManager 进行合并。Album\Model\AlbumTable 的工厂使用 ServiceManager 来创建一个 AlbumTableGateway 对象,以便传递到 AlbumTable 对象。一般会告知 ServiceManager 对象,AlbumTableGateway 对象的创建是通过得到一个 Zend\Db\Adapter\Adapter对象(也是从 ServiceManager 获取)来完成的,然后使用 AlbumTableGateway 对象来创建一个 TableGateway 对象。TableGateway 对象每当他创建一条新记录时,都会告知一个 Album 对象。TableGateway 类使用原型模式创建结果集和实体。这意味着在请求的时候不是实例化,而是系统克隆先前实例化的对象。参考 PHP Constructor Best Practices and the Prototype Pattern。
最终,我们需要配置 ServiceManager,让其知道如何获取 Zend\Db\Adapter\Adapter。这是通过使用一个工厂类 Zend\Db\Adapter\AdapterServiceFactory,我们能在合并配置系统中配置它。Zend Framework 2 的 ModuleManager 合并每一个模块的 module.config.php 文件中所有的配置,然后合并导出到 config/autoload 下的文件(*.global.php 和 *.local.php 文件)。我们将添加我们的数据库配置信息到 global.php 这个文件,这个文件应该提交到你的版本控制系统。如果你想的话,现在可以使用 local.php (版本控制系统之外的)来存储数据库的证书。修改 config/autoload/global.php (在 Zend 骨架的 root 中,并不在 Album 模块中),代码如下:
return array(
     'db' => array(
         'driver'         => 'Pdo',
         'dsn'            => 'mysql:dbname=zf2tutorial;host=localhost',
         'driver_options' => array(
             PDO::MYSQL_ATTR_INIT_COMMAND => 'SET NAMES \'UTF8\''
         ),
     ),
     'service_manager' => array(
         'factories' => array(
             'Zend\Db\Adapter\Adapter'
                     => 'Zend\Db\Adapter\AdapterServiceFactory',
         ),
     ),
 );
你应该将你的数据库证书放到 config/autoload/local.php,所以他们不是在 Git 存储库(就像 local.php 会被忽略):
return array(
     'db' => array(
         'username' => 'YOUR USERNAME HERE',
         'password' => 'YOUR PASSWORD HERE',
     ),
 );
回到控制器
现在 ServiceManager 可以创建一个 AlbumTable 实例了,我们可以添加一个方法到控制器去见检索它。添加 getAlbumTable() 到 AlbumController 类中:
// module/Album/src/Album/Controller/AlbumController.php:
     public function getAlbumTable()
     {
         if (!$this->albumTable) {
             $sm = $this->getServiceLocator();
             $this->albumTable = $sm->get('Album\Model\AlbumTable');
         }
         return $this->albumTable;
     }
你也应该添加下面这句到类首部:
protected $albumTable;每当我们需要与模型进行交互的时候,就可以在控制器中调用 getAlbumTable()。
如果服务定位器在 Module.php 中正确配置,那么在调用 getAlbumTable() 时将会拿到一个 Album\Model\AlbumTable 实例。
列举专辑
为了列举专辑,我们需要从模型中检索他们然后传递到视图。为此,我们在 AlbumController 填写 indexAction()。更新 AlbumController 的 indexAction() 方式如下:
// module/Album/src/Album/Controller/AlbumController.php:
 // ...
     public function indexAction()
     {
         return new ViewModel(array(
             'albums' => $this->getAlbumTable()->fetchAll(),
         ));
     }
 // ...
在 Zend Framework 2 中,为了在视图中设置变量,我们返回一个 ViewModel 实例,构造函数的第一个参数是一个来自动作的数组,包含我们需要的数据。然后会自动传递到视图脚本。ViewModel 对象还允许我们改变视图脚本,但是默认是使用{controller name}/{action name}。我们现在可以填写视图脚本 index.phtml。
<?php
// module/Album/view/album/album/index.phtml:
$title = 'My albums';
$this->headTitle($title);
?>
<h1><?php echo $this->escapeHtml($title); ?></h1>
<p>
<a href="<?php echo $this->url('album', array('action'=>'add'));?>">Add new album</a>
</p>
<table class="table">
<tr>
<th>Title</th>
<th>Artist</th>
<th> </th>
</tr>
<?php foreach ($albums as $album) : ?>
<tr>
<td><?php echo $this->escapeHtml($album->title);?></td>
<td><?php echo $this->escapeHtml($album->artist);?></td>
<td>
<a href="<?php echo $this->url('album',
array('action'=>'edit', 'id' => $album->id));?>">Edit</a>
<a href="<?php echo $this->url('album',
array('action'=>'delete', 'id' => $album->id));?>">Delete</a>
</td>
</tr>
<?php endforeach; ?>
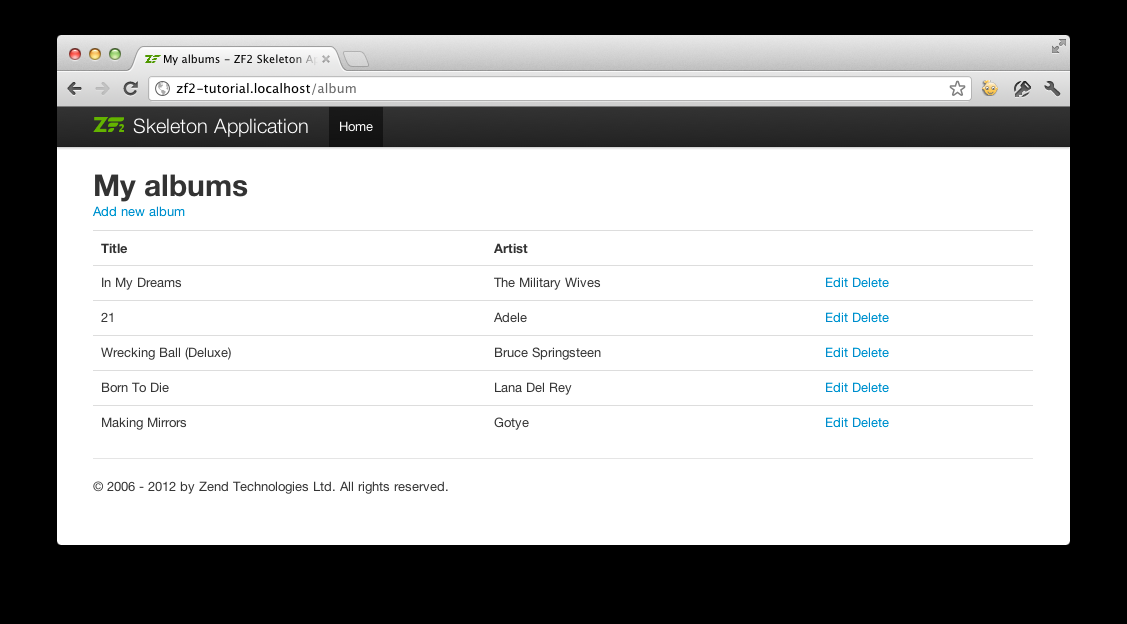
</table>第一件事是我们要为页面设置标题,标题可以在浏览器的标题栏显示,可以在 <head> 部分使用视图帮助方法 headTitle() 来进行设置标题。然后我们添加一个创建新 album 的链接。
Zend Framework 2 提供了视图帮助方法 url(),用来创建 URL。url() 的第一个参数是 route,用来创建 URL,第二个参数是所有变量的数组,用来填充字段的。在本例中,我们使用 ‘album’ route 以及设置两个字段变量 action 和 id。
我们遍历了 $albums 中从控制器分配的动作。Zend Framework 2 视图系统自动确认了填充到视图脚本域的变量,所以我们不用担心还要像旧框架 Zend Framework 1 中那样使用前缀 $this-> 来区别变量,当然你仍然可以在这么做。
然后创建一个表格来展示每一个 album 的标题和艺术家,提供一些链接,用以修改和删除记录。一个标准的变量是:使用迭代器循环遍历 albums 的列表,我们交替使用冒号和 endforeach 的形式;相对于尝试匹配括号,这就可以十分简单访问元素了。再一次使用视图帮助方法 url() 来创建修改和删除链接。
注意
我们可以使用视图帮助方法
escapeHtml()来辅助保护我们自己的跨站脚本的缺陷。(详情查看 http://en.wikipedia.org/wiki/Cross-site_scripting)
如果你打开 http://zf2-tutorial.localhost/album,就能看到如下效果: