多项目集中权限管理及分布式会话
在做一些企业内部项目时或一些互联网后台时;可能会涉及到集中权限管理,统一进行多项目的权限管理;另外也需要统一的会话管理,即实现单点身份认证和授权控制。
学习本章之前,请务必先学习《第十章 会话管理》和《第十六章 综合实例》,本章代码都是基于这两章的代码基础上完成的。
本章示例是同域名的场景下完成的,如果跨域请参考《第十五章 单点登录》和《第十七章 OAuth2 集成》了解使用 CAS 或 OAuth2 实现跨域的身份验证和授权。另外比如客户端 / 服务器端的安全校验可参考《第二十章 无状态 Web 应用集成》。
部署架构
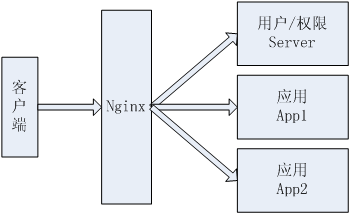
- 有三个应用:用于用户 / 权限控制的 Server(端口:8080);两个应用 App1(端口 9080)和 App2(端口 10080);
- 使用 Nginx 反向代理这三个应用,nginx.conf 的 server 配置部分如下:
server {
    listen 80;
    server_name  localhost;
    charset utf-8;
    location ~ ^/(chapter23-server)/ {
        proxy_pass http://127.0.0.1:8080;
        index /;
            proxy_set_header Host $host;
    }
    location ~ ^/(chapter23-app1)/ {
        proxy_pass http://127.0.0.1:9080;
        index /;
            proxy_set_header Host $host;
    }
    location ~ ^/(chapter23-app2)/ {
        proxy_pass http://127.0.0.1:10080;
        index /;
            proxy_set_header Host $host;
    }
}
如访问 http://localhost/chapter23-server 会自动转发到 http://localhost:8080/chapter23-server;
访问 http://localhost/chapter23-app1 会自动转发到 http://localhost:9080/chapter23-app1;
访问 http://localhost/chapter23-app3 会自动转发到 http://localhost:10080/chapter23-app3;
Nginx 的安装及使用请自行搜索学习,本文不再阐述。
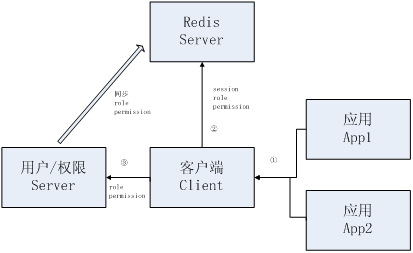
项目架构

- 首先通过用户 / 权限 Server 维护用户、应用、权限信息;数据都持久化到 MySQL 数据库中;
- 应用 App1 / 应用 App2 使用客户端 Client 远程调用用户 / 权限 Server 获取会话及权限信息。
此处使用 Mysql 存储会话,而不是使用如 Memcached/Redis 之类的,主要目的是降低学习成本;如果换成如 Redis 也不会很难;如:
使用如 Redis 还一个好处就是无需在用户 / 权限 Server 中开会话过期调度器,可以借助 Redis 自身的过期策略来完成。
模块关系依赖
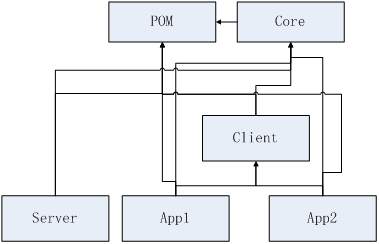
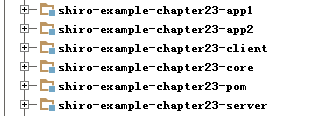
1、shiro-example-chapter23-pom 模块:提供了其他所有模块的依赖;这样其他模块直接继承它即可,简化依赖配置,如 shiro-example-chapter23-server:
<parent>
    <artifactId>shiro-example-chapter23-pom</artifactId>
    <groupId>com.github.zhangkaitao</groupId>
    <version>1.0-SNAPSHOT</version>
</parent>
2、shiro-example-chapter23-core 模块:提供给 shiro-example-chapter23-server、shiro-example-chapter23-client、shiro-example-chapter23-app * 模块的核心依赖,比如远程调用接口等;
3、shiro-example-chapter23-server 模块:提供了用户、应用、权限管理功能;
4、shiro-example-chapter23-client 模块:提供给应用模块获取会话及应用对应的权限信息;
5、shiro-example-chapter23-app * 模块:各个子应用,如一些内部管理系统应用;其登录都跳到 shiro-example-chapter23-server 登录;另外权限都从 shiro-example-chapter23-server 获取(如通过远程调用)。
shiro-example-chapter23-pom 模块
其 pom.xml 的 packaging 类型为 pom,并且在该 pom 中加入其他模块需要的依赖,然后其他模块只需要把该模块设置为 parent 即可自动继承这些依赖,如 shiro-example-chapter23-server 模块:
<parent>
<artifactId>shiro-example-chapter23-pom</artifactId>
<groupId>com.github.zhangkaitao</groupId>
<version>1.0-SNAPSHOT</version>
</parent> 简化其他模块的依赖配置等。
shiro-example-chapter23-core 模块
提供了其他模块共有的依赖,如远程调用接口:
public interface RemoteServiceInterface {
    public Session getSession(String appKey, Serializable sessionId);
    Serializable createSession(Session session);
    public void updateSession(String appKey, Session session);
    public void deleteSession(String appKey, Session session);
    public PermissionContext getPermissions(String appKey, String username);
}
提供了会话的 CRUD,及根据应用 key 和用户名获取权限上下文(包括角色和权限字符串);shiro-example-chapter23-server 模块服务端实现;shiro-example-chapter23-client 模块客户端调用。
另外提供了 com.github.zhangkaitao.shiro.chapter23.core.ClientSavedRequest,其扩展了 org.apache.shiro.web.util.SavedRequest;用于 shiro-example-chapter23-app * 模块当访问一些需要登录的请求时,自动把请求保存下来,然后重定向到 shiro-example-chapter23-server 模块登录;登录成功后再重定向回来;因为 SavedRequest 不保存 URL 中的 schema://domain:port 部分;所以才需要扩展 SavedRequest;使得 ClientSavedRequest 能保存 schema://domain:port;这样才能从一个应用重定向另一个(要不然只能在一个应用内重定向):
    public String getRequestUrl() {
        String requestURI = getRequestURI();
        if(backUrl != null) {//1
            if(backUrl.toLowerCase().startsWith("http://") || backUrl.toLowerCase().startsWith("https://")) {
                return backUrl;
            } else if(!backUrl.startsWith(contextPath)) {//2
                requestURI = contextPath + backUrl;
            } else {//3
                requestURI = backUrl;
            }
        }
        StringBuilder requestUrl = new StringBuilder(scheme);//4
        requestUrl.append("://");
        requestUrl.append(domain);//5
        //6
        if("http".equalsIgnoreCase(scheme) && port != 80) {
            requestUrl.append(":").append(String.valueOf(port));
        } else if("https".equalsIgnoreCase(scheme) && port != 443) {
            requestUrl.append(":").append(String.valueOf(port));
        }
        //7
        requestUrl.append(requestURI);
        //8
        if (backUrl == null && getQueryString() != null) {
            requestUrl.append("?").append(getQueryString());
        }
        return requestUrl.toString();
    }
- 如果从外部传入了 successUrl(登录成功之后重定向的地址),且以
http://或https://开头那么直接返回(相应的拦截器直接重定向到它即可); - 如果 successUrl 有值但没有上下文,拼上上下文;
- 否则,如果 successUrl 有值,直接赋值给 requestUrl 即可;否则,如果 successUrl 没值,那么 requestUrl 就是当前请求的地址;
- 拼上 url 前边的 schema,如 http 或 https;
- 拼上域名;
- 拼上重定向到的地址(带上下文);
- 如果 successUrl 没值,且有查询参数,拼上;
- 返回该地址,相应的拦截器直接重定向到它即可。
shiro-example-chapter23-server 模块
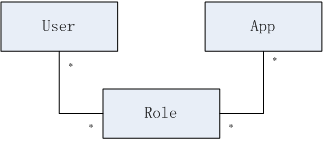
简单的实体关系图
简单数据字典
用户 (sys_user)
|
名称 |
类型 |
长度 |
描述 |
|
id |
bigint |
|
编号 主键 |
|
username |
varchar |
100 |
用户名 |
|
password |
varchar |
100 |
密码 |
|
salt |
varchar |
50 |
盐 |
|
locked |
bool |
账户是否锁定 |
应用 (sys_app)
|
名称 |
类型 |
长度 |
描述 |
|
id |
bigint |
|
编号 主键 |
|
name |
varchar |
100 |
应用名称 |
|
app_key |
varchar |
100 |
应用 key(唯一) |
|
app_secret |
varchar |
100 |
应用安全码 |
|
available |
bool |
|
是否锁定 |
授权 (sys_authorization)
|
名称 |
类型 |
长度 |
描述 |
|
id |
bigint |
|
编号 主键 |
|
user_id |
bigint |
|
所属用户 |
|
app_id |
bigint |
|
所属应用 |
|
role_ids |
varchar |
100 |
角色列表 |
用户:比《第十六章 综合实例》少了 role_ids,因为本章是多项目集中权限管理;所以授权时需要指定相应的应用;而不是直接给用户授权;所以不能在用户中出现 role_ids 了;
应用:所有集中权限的应用;在此处需要指定应用 key(app_key) 和应用安全码(app_secret),app 在访问 server 时需要指定自己的 app_key 和用户名来获取该 app 对应用户权限信息;另外 app_secret 可以认为 app 的密码,比如需要安全访问时可以考虑使用它,可参考《第二十章 无状态 Web 应用集成》。另外 available 属性表示该应用当前是否开启;如果 false 表示该应用当前不可用,即不能获取到相应的权限信息。
授权:给指定的用户在指定的 app 下授权,即角色是与用户和 app 存在关联关系。
因为本章使用了《第十六章 综合实例》代码,所以还有其他相应的表结构(本章未使用到)。
表 / 数据 SQL
具体请参考
- sql/shiro-schema.sql (表结构)
- sql/shiro-data.sql (初始数据)
实体
具体请参考 com.github.zhangkaitao.shiro.chapter23.entity 包下的实体,此处就不列举了。
DAO
具体请参考 com.github.zhangkaitao.shiro.chapter23.dao 包下的 DAO 接口及实现。
Service
具体请参考 com.github.zhangkaitao.shiro.chapter23.service 包下的 Service 接口及实现。以下是出了基本 CRUD 之外的关键接口:
public interface AppService {
    public Long findAppIdByAppKey(String appKey);// 根据appKey查找AppId
}
public interface AuthorizationService {
//根据AppKey和用户名查找其角色
public Set<String> findRoles(String appKey, String username);
//根据AppKey和用户名查找权限字符串
public Set<String> findPermissions(String appKey, String username);
} 根据 AppKey 和用户名查找用户在指定应用中对于的角色和权限字符串。
UserRealm
protected AuthorizationInfo doGetAuthorizationInfo(PrincipalCollection principals) {
    String username = (String)principals.getPrimaryPrincipal();
    SimpleAuthorizationInfo authorizationInfo = new SimpleAuthorizationInfo();
    authorizationInfo.setRoles(
        authorizationService.findRoles(Constants.SERVER_APP_KEY, username));
    authorizationInfo.setStringPermissions(
    authorizationService.findPermissions(Constants.SERVER_APP_KEY, username));
    return authorizationInfo;
}
此处需要调用 AuthorizationService 的 findRoles/findPermissions 方法传入 AppKey 和用户名来获取用户的角色和权限字符串集合。其他的和《第十六章 综合实例》代码一样。
ServerFormAuthenticationFilter
public class ServerFormAuthenticationFilter extends FormAuthenticationFilter {
    protected void issueSuccessRedirect(ServletRequest request, ServletResponse response) throws Exception {
        String fallbackUrl = (String) getSubject(request, response)
                .getSession().getAttribute("authc.fallbackUrl");
        if(StringUtils.isEmpty(fallbackUrl)) {
            fallbackUrl = getSuccessUrl();
        }
        WebUtils.redirectToSavedRequest(request, response, fallbackUrl);
    }
}
因为是多项目登录,比如如果是从其他应用中重定向过来的,首先检查 Session 中是否有 “authc.fallbackUrl” 属性,如果有就认为它是默认的重定向地址;否则使用 Server 自己的 successUrl 作为登录成功后重定向到的地址。
MySqlSessionDAO
将会话持久化到 Mysql 数据库;此处大家可以将其实现为如存储到 Redis/Memcached 等,实现策略请参考《第十章 会话管理》中的会话存储 / 持久化章节的 MySessionDAO,完全一样。
MySqlSessionValidationScheduler
和《第十章 会话管理》中的会话验证章节部分中的 MySessionValidationScheduler 完全一样。如果使用如 Redis 之类的有自动过期策略的 DB,完全可以不用实现 SessionValidationScheduler,直接借助于这些 DB 的过期策略即可。
RemoteService
public class RemoteService implements RemoteServiceInterface {
    @Autowired  private AuthorizationService authorizationService;
    @Autowired  private SessionDAO sessionDAO;
    public Session getSession(String appKey, Serializable sessionId) {
        return sessionDAO.readSession(sessionId);
    }
    public Serializable createSession(Session session) {
        return sessionDAO.create(session);
    }
    public void updateSession(String appKey, Session session) {
        sessionDAO.update(session);
    }
    public void deleteSession(String appKey, Session session) {
        sessionDAO.delete(session);
    }
    public PermissionContext getPermissions(String appKey, String username) {
        PermissionContext permissionContext = new PermissionContext();
        permissionContext.setRoles(authorizationService.findRoles(appKey, username));
        permissionContext.setPermissions(authorizationService.findPermissions(appKey, username));
        return permissionContext;
    }
}
将会使用 HTTP 调用器暴露为远程服务,这样其他应用就可以使用相应的客户端调用这些接口进行 Session 的集中维护及根据 AppKey 和用户名获取角色 / 权限字符串集合。此处没有实现安全校验功能,如果是局域网内使用可以通过限定 IP 完成;否则需要使用如《第二十章 无状态 Web 应用集成》中的技术完成安全校验。
然后在 spring-mvc-remote-service.xml 配置文件把服务暴露出去:
<bean id="remoteService"
  class="com.github.zhangkaitao.shiro.chapter23.remote.RemoteService"/>
<bean name="/remoteService"
  class="org.springframework.remoting.httpinvoker.HttpInvokerServiceExporter">
    <property name="service" ref="remoteService"/>
    <property name="serviceInterface"
    value="com.github.zhangkaitao.shiro.chapter23.remote.RemoteServiceInterface">
</bean>
Shiro 配置文件 spring-config-shiro.xml
和《第十六章 综合实例》配置类似,但是需要在 shiroFilter 中的 filterChainDefinitions 中添加如下配置,即远程调用不需要身份认证:
/remoteService = anon
对于 userRealm 的缓存配置直接禁用;因为如果开启,修改了用户权限不会自动同步到缓存;另外请参考《第十一章 缓存机制》进行缓存的正确配置。
服务器端数据维护
1、首先开启 ngnix 反向代理;然后就可以直接访问 http://localhost/chapter23-server/; 2、输入默认的用户名密码:admin/123456 登录 3、应用管理,进行应用的 CRUD,主要维护应用 KEY(必须唯一)及应用安全码;客户端就可以使用应用 KEY 获取用户对应应用的权限了。

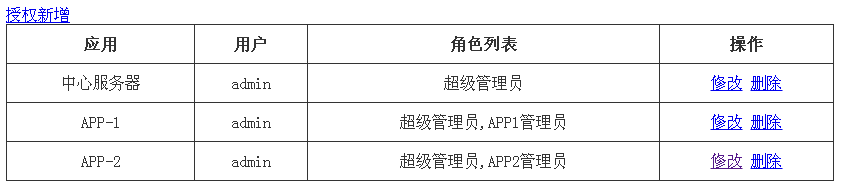
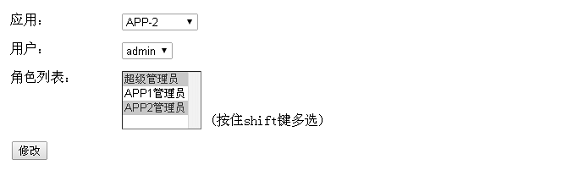
4、授权管理,维护在哪个应用中用户的角色列表。这样客户端就可以根据应用 KEY 及用户名获取到对应的角色 / 权限字符串列表了。


shiro-example-chapter23-client 模块
Client 模块提供给其他应用模块依赖,这样其他应用模块只需要依赖 Client 模块,然后再在相应的配置文件中配置如登录地址、远程接口地址、拦截器链等等即可,简化其他应用模块的配置。
配置远程服务 spring-client-remote-service.xml
<bean id="remoteService"
class="org.springframework.remoting.httpinvoker.HttpInvokerProxyFactoryBean">
<property name="serviceUrl" value="${client.remote.service.url}"/>
<property name="serviceInterface"
value="com.github.zhangkaitao.shiro.chapter23.remote.RemoteServiceInterface"/>
</bean> client.remote.service.url 是远程服务暴露的地址;通过相应的 properties 配置文件配置,后续介绍。然后就可以通过 remoteService 获取会话及角色 / 权限字符串集合了。
ClientRealm
public class ClientRealm extends AuthorizingRealm {
    private RemoteServiceInterface remoteService;
    private String appKey;
    public void setRemoteService(RemoteServiceInterface remoteService) {
        this.remoteService = remoteService;
    }
    public void setAppKey(String appKey) {
        this.appKey = appKey;
    }
    protected AuthorizationInfo doGetAuthorizationInfo(PrincipalCollection principals) {
        String username = (String) principals.getPrimaryPrincipal();
        SimpleAuthorizationInfo authorizationInfo = new SimpleAuthorizationInfo();
        PermissionContext context = remoteService.getPermissions(appKey, username);
        authorizationInfo.setRoles(context.getRoles());
        authorizationInfo.setStringPermissions(context.getPermissions());
        return authorizationInfo;
    }
    protected AuthenticationInfo doGetAuthenticationInfo(AuthenticationToken token) throws AuthenticationException {
        //永远不会被调用
        throw new UnsupportedOperationException("永远不会被调用");
    }
}
ClientRealm 提供身份认证信息和授权信息,此处因为是其他应用依赖客户端,而这些应用不会实现身份认证,所以 doGetAuthenticationInfo 获取身份认证信息直接无须实现。另外获取授权信息,是通过远程暴露的服务 RemoteServiceInterface 获取,提供 appKey 和用户名获取即可。
ClientSessionDAO
public class ClientSessionDAO extends CachingSessionDAO {
    private RemoteServiceInterface remoteService;
    private String appKey;
    public void setRemoteService(RemoteServiceInterface remoteService) {
        this.remoteService = remoteService;
    }
    public void setAppKey(String appKey) {
        this.appKey = appKey;
    }
    protected void doDelete(Session session) {
        remoteService.deleteSession(appKey, session);
    }
    protected void doUpdate(Session session) {
        remoteService.updateSession(appKey, session);
}
protected Serializable doCreate(Session session) {
        Serializable sessionId = remoteService.createSession(session);
        assignSessionId(session, sessionId);
        return sessionId;
    }
    protected Session doReadSession(Serializable sessionId) {
        return remoteService.getSession(appKey, sessionId);
    }
}
Session 的维护通过远程暴露接口实现,即本地不维护会话。
ClientAuthenticationFilter
public class ClientAuthenticationFilter extends AuthenticationFilter {
    protected boolean isAccessAllowed(ServletRequest request, ServletResponse response, Object mappedValue) {
        Subject subject = getSubject(request, response);
        return subject.isAuthenticated();
    }
    protected boolean onAccessDenied(ServletRequest request, ServletResponse response) throws Exception {
        String backUrl = request.getParameter("backUrl");
        saveRequest(request, backUrl, getDefaultBackUrl(WebUtils.toHttp(request)));
        return false;
    }
    protected void saveRequest(ServletRequest request, String backUrl, String fallbackUrl) {
        Subject subject = SecurityUtils.getSubject();
        Session session = subject.getSession();
        HttpServletRequest httpRequest = WebUtils.toHttp(request);
        session.setAttribute("authc.fallbackUrl", fallbackUrl);
        SavedRequest savedRequest = new ClientSavedRequest(httpRequest, backUrl);
        session.setAttribute(WebUtils.SAVED_REQUEST_KEY, savedRequest);
}
    private String getDefaultBackUrl(HttpServletRequest request) {
        String scheme = request.getScheme();
        String domain = request.getServerName();
        int port = request.getServerPort();
        String contextPath = request.getContextPath();
        StringBuilder backUrl = new StringBuilder(scheme);
        backUrl.append("://");
        backUrl.append(domain);
        if("http".equalsIgnoreCase(scheme) && port != 80) {
            backUrl.append(":").append(String.valueOf(port));
        } else if("https".equalsIgnoreCase(scheme) && port != 443) {
            backUrl.append(":").append(String.valueOf(port));
        }
        backUrl.append(contextPath);
        backUrl.append(getSuccessUrl());
        return backUrl.toString();
    }
}
ClientAuthenticationFilter 是用于实现身份认证的拦截器(authc),当用户没有身份认证时;
- 首先得到请求参数 backUrl,即登录成功重定向到的地址;
- 然后保存保存请求到会话,并重定向到登录地址(server 模块);
- 登录成功后,返回地址按照如下顺序获取:backUrl、保存的当前请求地址、defaultBackUrl(即设置的 successUrl);
ClientShiroFilterFactoryBean
public class ClientShiroFilterFactoryBean extends ShiroFilterFactoryBean implements ApplicationContextAware {
    private ApplicationContext applicationContext;
    public void setApplicationContext(ApplicationContext applicationContext) {
        this.applicationContext = applicationContext;
    }
    public void setFiltersStr(String filters) {
        if(StringUtils.isEmpty(filters)) {
            return;
        }
        String[] filterArray = filters.split(";");
        for(String filter : filterArray) {
            String[] o = filter.split("=");
            getFilters().put(o[0], (Filter)applicationContext.getBean(o[1]));
        }
    }
    public void setFilterChainDefinitionsStr(String filterChainDefinitions) {
        if(StringUtils.isEmpty(filterChainDefinitions)) {
            return;
        }
        String[] chainDefinitionsArray = filterChainDefinitions.split(";");
        for(String filter : chainDefinitionsArray) {
            String[] o = filter.split("=");
            getFilterChainDefinitionMap().put(o[0], o[1]);
        }
    }
} - setFiltersStr:设置拦截器,设置格式如 “filterName=filterBeanName; filterName=filterBeanName”;多个之间分号分隔;然后通过 applicationContext 获取 filterBeanName 对应的 Bean 注册到拦截器 Map 中;
- setFilterChainDefinitionsStr:设置拦截器链,设置格式如 “url=filterName1[config],filterName2; url=filterName1[config],filterName2”;多个之间分号分隔;
Shiro 客户端配置 spring-client.xml
提供了各应用通用的 Shiro 客户端配置;这样应用只需要导入相应该配置即可完成 Shiro 的配置,简化了整个配置过程。
<context:property-placeholder location=
"classpath:client/shiro-client-default.properties,classpath:client/shiro-client.properties"/> 提供给客户端配置的 properties 属性文件,client/shiro-client-default.properties 是客户端提供的默认的配置;classpath:client/shiro-client.properties 是用于覆盖客户端默认配置,各应用应该提供该配置文件,然后提供各应用个性配置。
<bean id="remoteRealm" class="com.github.zhangkaitao.shiro.chapter23.client.ClientRealm">
<property name="cachingEnabled" value="false"/>
<property name="appKey" value="${client.app.key}"/>
<property name="remoteService" ref="remoteService"/>
</bean> appKey:使用 ${client.app.key} 占位符替换,即需要在之前的 properties 文件中配置。
<bean id="sessionIdCookie" class="org.apache.shiro.web.servlet.SimpleCookie">
<constructor-arg value="${client.session.id}"/>
<property name="httpOnly" value="true"/>
<property name="maxAge" value="-1"/>
<property name="domain" value="${client.cookie.domain}"/>
<property name="path" value="${client.cookie.path}"/>
</bean> Session Id Cookie,cookie 名字、域名、路径等都是通过配置文件配置。
<bean id="sessionDAO"
class="com.github.zhangkaitao.shiro.chapter23.client.ClientSessionDAO">
<property name="sessionIdGenerator" ref="sessionIdGenerator"/>
<property name="appKey" value="${client.app.key}"/>
<property name="remoteService" ref="remoteService"/>
</bean> SessionDAO 的 appKey,也是通过 ${client.app.key} 占位符替换,需要在配置文件配置。
<bean id="sessionManager"
class="org.apache.shiro.web.session.mgt.DefaultWebSessionManager">
<property name="sessionValidationSchedulerEnabled" value="false"/>//省略其他
</bean> 其他应用无须进行会话过期调度,所以 sessionValidationSchedulerEnabled=false。
<bean id="clientAuthenticationFilter"
class="com.github.zhangkaitao.shiro.chapter23.client.ClientAuthenticationFilter"/> 其他应用无须进行会话过期调度,所以 sessionValidationSchedulerEnabled=false。
<bean id="clientAuthenticationFilter"
class="com.github.zhangkaitao.shiro.chapter23.client.ClientAuthenticationFilter"/> 应用的身份认证使用 ClientAuthenticationFilter,即如果没有身份认证,则会重定向到 Server 模块完成身份认证,身份认证成功后再重定向回来。
<bean id="shiroFilter"
class="com.github.zhangkaitao.shiro.chapter23.client.ClientShiroFilterFactoryBean">
<property name="securityManager" ref="securityManager"/>
<property name="loginUrl" value="${client.login.url}"/>
<property name="successUrl" value="${client.success.url}"/>
<property name="unauthorizedUrl" value="${client.unauthorized.url}"/>
<property name="filters">
<util:map>
<entry key="authc" value-ref="clientAuthenticationFilter"/>
</util:map>
</property>
<property name="filtersStr" value="${client.filters}"/>
<property name="filterChainDefinitionsStr" value="${client.filter.chain.definitions}"/>
</bean> ShiroFilter 使用我们自定义的 ClientShiroFilterFactoryBean,然后 loginUrl(登录地址)、successUrl(登录成功后默认的重定向地址)、unauthorizedUrl(未授权重定向到的地址)通过占位符替换方式配置;另外 filtersStr 和 filterChainDefinitionsStr 也是使用占位符替换方式配置;这样就可以在各应用进行自定义了。
默认配置 client/shiro-client-default.properties
\#各应用的appKey
client.app.key=
\#远程服务URL地址
client.remote.service.url=http://localhost/chapter23-server/remoteService
\#登录地址
client.login.url=http://localhost/chapter23-server/login
\#登录成功后,默认重定向到的地址
client.success.url=/
\#未授权重定向到的地址
client.unauthorized.url=http://localhost/chapter23-server/unauthorized
\#session id 域名
client.cookie.domain=
\#session id 路径
client.cookie.path=/
\#cookie中的session id名称
client.session.id=sid
\#cookie中的remember me名称
client.rememberMe.id=rememberMe
\#过滤器 name=filter-ref;name=filter-ref
client.filters=
\#过滤器链 格式 url=filters;url=filters
client.filter.chain.definitions=/**=anon
在各应用中主要配置 client.app.key、client.filters、client.filter.chain.definitions。
shiro-example-chapter23-app * 模块
继承 shiro-example-chapter23-pom 模块
<parent>
    <artifactId>shiro-example-chapter23-pom</artifactId>
    <groupId>com.github.zhangkaitao</groupId>
    <version>1.0-SNAPSHOT</version>
</parent>
依赖 shiro-example-chapter23-client 模块
<dependency>
    <groupId>com.github.zhangkaitao</groupId>
    <artifactId>shiro-example-chapter23-client</artifactId>
    <version>1.0-SNAPSHOT</version>
</dependency>
客户端配置 client/shiro-client.properties
配置 shiro-example-chapter23-app1
client.app.key=645ba612-370a-43a8-a8e0-993e7a590cf0
client.success.url=/hello
client.filter.chain.definitions=/hello=anon;/login=authc;/**=authc
client.app.key 是 server 模块维护的,直接拷贝过来即可;client.filter.chain.definitions 定义了拦截器链;比如访问 / hello,匿名即可。
配置 shiro-example-chapter23-app2
client.app.key=645ba613-370a-43a8-a8e0-993e7a590cf0
client.success.url=/hello
client.filter.chain.definitions=/hello=anon;/login=authc;/**=authc
和 app1 类似,client.app.key 是 server 模块维护的,直接拷贝过来即可;client.filter.chain.definitions 定义了拦截器链;比如访问 / hello,匿名即可。
web.xml
<context-param>
<param-name>contextConfigLocation</param-name>
<param-value>
classpath:client/spring-client.xml
</param-value>
</context-param>
<listener>
<listener-class>
org.springframework.web.context.ContextLoaderListener
</listener-class>
</listener> 指定加载客户端 Shiro 配置,client/spring-client.xml。
<filter>
    <filter-name>shiroFilter</filter-name>
    <filter-class>org.springframework.web.filter.DelegatingFilterProxy</filter-class>
    <init-param>
        <param-name>targetFilterLifecycle</param-name>
        <param-value>true</param-value>
    </init-param>
</filter>
<filter-mapping>
    <filter-name>shiroFilter</filter-name>
    <url-pattern>/*</url-pattern>
</filter-mapping>
配置 ShiroFilter 拦截器。
控制器
shiro-example-chapter23-app1
@Controller
public class HelloController {
    @RequestMapping("/hello")
    public String hello() {
        return "success";
    }
    @RequestMapping(value = "/attr", method = RequestMethod.POST)
    public String setAttr(
            @RequestParam("key") String key, @RequestParam("value") String value) {
        SecurityUtils.getSubject().getSession().setAttribute(key, value);
        return "success";
    }
    @RequestMapping(value = "/attr", method = RequestMethod.GET)
    public String getAttr(
            @RequestParam("key") String key, Model model) {
        model.addAttribute("value",
            SecurityUtils.getSubject().getSession().getAttribute(key));
        return "success";
    }
    @RequestMapping("/role1")
    @RequiresRoles("role1")
    public String role1() {
        return "success";
    }
}
shiro-example-chapter23-app2 的控制器类似,role2 方法使用 @RequiresRoles("role2") 注解,即需要角色 2。
其他配置请参考源码。
测试
1、安装配置启动 nginx
1、首先到 http://nginx.org/en/download.html 下载,比如我下载的是 windows 版本的;
2、然后编辑 conf/nginx.conf 配置文件,在 server 部分添加如下部分:
    location ~ ^/(chapter23-server)/ {
        proxy_pass http://127.0.0.1:8080;
        index /;
            proxy_set_header Host $host;
    }
    location ~ ^/(chapter23-app1)/ {
        proxy_pass http://127.0.0.1:9080;
        index /;
            proxy_set_header Host $host;
    }
    location ~ ^/(chapter23-app2)/ {
        proxy_pass http://127.0.0.1:10080;
        index /;
            proxy_set_header Host $host;
    }
3、最后双击 nginx.exe 启动 Nginx 即可。
已经配置好的 nginx 请到 shiro-example-chapter23-nginx 模块下下周 nginx-1.5.11.rar 即可。
2、安装依赖
1、首先安装 shiro-example-chapter23-core 依赖,到 shiro-example-chapter23-core 模块下运行 mvn install 安装 core 模块。
2、接着到 shiro-example-chapter23-client 模块下运行 mvn install 安装客户端模块。
3、启动 Server 模块
到 shiro-example-chapter23-server 模块下运行 mvn jetty:run 启动该模块;使用 http://localhost:8080/chapter23-server/ 即可访问,因为启动了 nginx,那么可以直接访问 http://localhost/chapter23-server/。
4、启动 App* 模块
到 shiro-example-chapter23-app1 和 shiro-example-chapter23-app2 模块下分别运行 mvn jetty:run 启动该模块;使用 http://localhost:9080/chapter23-app1/ 和 http://localhost:10080/chapter23-app2/ 即可访问,因为启动了 nginx,那么可以直接访问 http://localhost/chapter23-app1/ 和 http://localhost/chapter23-app2/。
5、服务器端维护
1、访问 http://localhost/chapter23-server/;
2、输入默认的用户名密码:admin/123456 登录
3、应用管理,进行应用的 CRUD,主要维护应用 KEY(必须唯一)及应用安全码;客户端就可以使用应用 KEY 获取用户对应应用的权限了。

4、授权管理,维护在哪个应用中用户的角色列表。这样客户端就可以根据应用 KEY 及用户名获取到对应的角色 / 权限字符串列表了。
*6、App 模块身份认证及授权**
1、在未登录情况下访问 http://localhost/chapter23-app1/hello,看到下图:

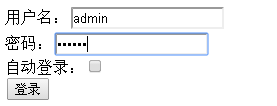
2、登录地址是 http://localhost/chapter23-app1/login?backUrl=/chapter23-app1,即登录成功后重定向回 http://localhost/chapter23-app1(这是个错误地址,为了测试登录成功后重定向地址),点击登录按钮后重定向到 Server 模块的登录界面:
3、登录成功后,会重定向到相应的登录成功地址;接着访问 http://localhost/chapter23-app1/hello,看到如下图:
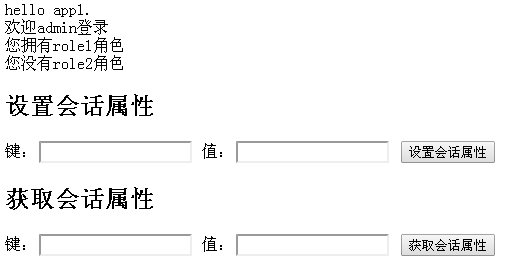
4、可以看到 admin 登录,及其是否拥有 role1/role2 角色;可以在 server 模块移除 role1 角色或添加 role2 角色看看页面变化;
5、可以在 http://localhost/chapter23-app1/hello 页面设置属性,如 key=123;接着访问 http://localhost/chapter23-app2/attr?key=key 就可以看到刚才设置的属性,如下图:

另外在 app2,用户默认拥有 role2 角色,而没有 role1 角色。
到此整个测试就完成了,可以看出本示例实现了:会话的分布式及权限的集中管理。
本示例缺点
- 没有加缓存;
- 客户端每次获取会话 / 权限都需要通过客户端访问服务端;造成服务端单点和请求压力大;单点可以考虑使用集群来解决;请求压力大需要考虑配合缓存服务器(如 Redis)来解决;即每次会话 / 权限获取时首先查询缓存中是否存在,如果有直接获取即可;否则再查服务端;降低请求压力;
- 会话的每次更新(比如设置属性 / 更新最后访问时间戳)都需要同步到服务端;也造成了请求压力过大;可以考虑在请求的最后只同步一次会话(需要对 Shiro 会话进行改造,通过如拦截器在执行完请求后完成同步,这样每次请求只同步一次);
- 只能同域名才能使用,即会话 ID 是从同一个域名下获取,如果跨域请考虑使用 CAS/OAuth2 之实现。
所以实际应用时可能还是需要改造的,但大体思路是差不多的。