WebGL 场景图
我很肯定一些 CS 大师或者图形大师会给我们讲很多东西,但是...一个场景图通常是一个树结构,在这个树结构中的每个节点都生成一个矩阵...嗯,这并不是一个非常有用的定义。也许讲一些例子会非常有用。
大多数的 3D 引擎都使用一个场景图。你在场景图中放置你想要在场景图中出现的东西。引擎然后按场景图行进,同时计算出需要绘制的一系列东西。场景图都是有层次感的,例如,如果你想要去制作一个宇宙模拟图,你可能需要一个图与下面所示的图相似
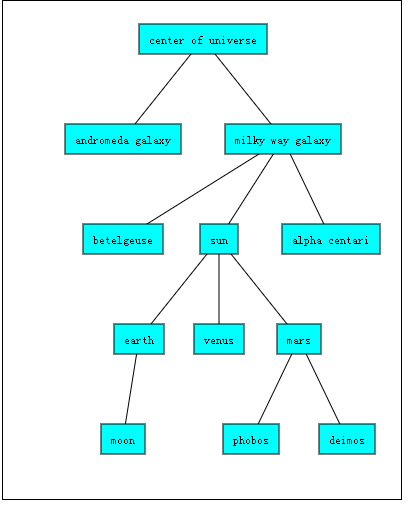
一个场景图的意义是什么?一个场景图的 #1 特点是它为矩阵提供了一个父母子女关系,正如我们在二维矩阵数学中讨论的。因此,例如在一个简单的宇宙中( 但是不是实际的 )模拟星星( 孩子 ),随着它们的星系移动( 父母 )。同样,一个月亮( 孩子 )随着行星移动,如果你移动了地球,月亮会跟着它一起移动。如果你移动一个星系,在这个星系中的所有的星星也会随着它一起移动。在上面的图中拖动名称,希望你可以看到它们之间的关系。
如果你回到二维矩阵数学,你可能会想起我们将大量矩阵相乘来达到转化,旋转和缩放对象。一个场景图提供了一个结构来帮助决定要将哪个矩阵数学应用到对象上。
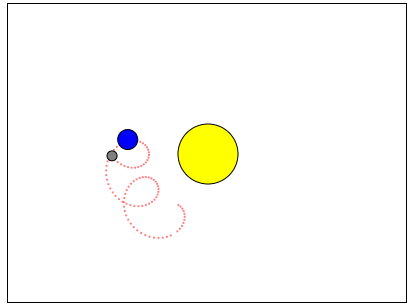
通常,在一个场景图中的每个节点都表示一个局部空间。给出了正确的矩阵数学,在这个局部空间的任何东西都可以忽略在他上面的任何东西。用来说明同一件事的另一种方式是月亮只关心绕地球轨道运行。它不关心绕太阳的轨道运行。没有场景图结构,你需要做更多的复杂数学,来计算怎样才可以得到月亮绕太阳的轨道,因为它绕太阳的轨道看起来像这样
使用场景图,你可以将月球看做是地球的孩子,然后简单的绕地球转动。场景图很注意地球围绕太阳转的事实。它是通过节点和它走的矩阵相乘来完成的。
worldMatrix = greatGrandParent * grandParent * parent * self(localMatrix)在具体的条款中,我们的宇宙模型可能是
worldMatrixForMoon = galaxyMatrix * starMatrix * planetMatrix * moonMatrix;我们可以使用一个有效的递归函数来非常简单的完成这些
function computeWorldMatrix(currentNode, parentWorldMatrix) {
// compute our world matrix by multplying our local matrix with
// our parent's world matrix.
var worldMatrix = matrixMultiply(currentNode.localMatrix, parentWorldMatrix);

// now do the same for all of our children
currentNode.children.forEach(function(child) {
computeWorldMatrix(child, worldMatrix);
});
}
这将会给我们引进一些在 3D 场景图中非常常见的术语。
-
localMatrix:当前节点的本地矩阵。它在原点转换它和在局部空间它的孩子。 worldMatrix:对于给定的节点,它需要获取那个节点的局部空间的东西,同时将它转换到场景图的根节点的空间。或者,换句话说,将它置于世界中。如果我们为月球计算世界矩阵,我们将会得到上面我们看到的轨道。
制作场景图非常简单。让我们定义一个简单的节点对象。还有无数个方式可以组织场景图,我不确定哪一种方式是最好的。最常见的是有一个可以选择绘制东西的字段。
 var node = {
   localMatrix: ...,  // the "local" matrix for this node
   worldMatrix: ...,  // the "world" matrix for this node
   children: [],  // array of children
   thingToDraw: ??,   // thing to draw at this node
};
让我们来做一个太阳系场景图。我不准备使用花式纹理或者类似的东西,因为它会使例子变的混乱。首先让我们来制作一些功能来帮助管理这些节点。首先我们将做一个节点类
var Node = function() {
  this.children = [];
  this.localMatrix = makeIdentity();
  this.worldMatrix = makeIdentity();
};
我们给出一种设置一个节点的父母的方式
Node.prototype.setParent = function(parent) {
  // remove us from our parent
  if (this.parent) {
var ndx = this.parent.children.indexOf(this);
if (ndx >= 0) {
  this.parent.children.splice(ndx, 1);
}
  }

  // Add us to our new parent
  if (parent) {
parent.children.append(this);
  }
  this.parent = parent;
};
这里,这里的代码是从基于它们的父子关系的本地矩阵计算世界矩阵。如果我们从父母和递归访问它孩子开始,我们可以计算它们的世界矩阵。
Node.prototype.updateWorldMatrix = function(parentWorldMatrix) {
  if (parentWorldMatrix) {
// a matrix was passed in so do the math and
// store the result in `this.worldMatrix`.
matrixMultiply(this.localMatrix, parentWorldMatrix, this.worldMatrix);
  } else {
// no matrix was passed in so just copy.
copyMatrix(this.localMatrix, this.worldMatrix);
  }

  // now process all the children
  var worldMatrix = this.worldMatrix;
  this.children.forEach(function(child) {
child.updateWorldMatrix(worldMatrix);
  });
};
让我们仅仅做太阳,地球,月亮,来保持场景图简单。当然我们会使用假的距离,来使东西适合屏幕。我们将只使用一个单球体模型,然后太阳为淡黄色,地球为蓝 - 淡绿色,月球为淡灰色。如果你对 drawInfo,bufferInfo 和 programInfo 并不熟悉,你可以查看前一篇文章。
// Let's make all the nodes
var sunNode = new Node();
sunNode.localMatrix = makeTranslation(0, 0, 0);  // sun at the center
sunNode.drawInfo = {
  uniforms: {
u_colorOffset: [0.6, 0.6, 0, 1], // yellow
u_colorMult:   [0.4, 0.4, 0, 1],
  },
  programInfo: programInfo,
  bufferInfo: sphereBufferInfo,
};

var earthNode = new Node();
earthNode.localMatrix = makeTranslation(100, 0, 0);  // earth 100 units from the sun
earthNode.drawInfo = {
  uniforms: {
u_colorOffset: [0.2, 0.5, 0.8, 1],  // blue-green
u_colorMult:   [0.8, 0.5, 0.2, 1],
  },
  programInfo: programInfo,
  bufferInfo: sphereBufferInfo,
};

var moonNode = new Node();
moonNode.localMatrix = makeTranslation(20, 0, 0);  // moon 20 units from the earth
moonNode.drawInfo = {
  uniforms: {
u_colorOffset: [0.6, 0.6, 0.6, 1],  // gray
u_colorMult:   [0.1, 0.1, 0.1, 1],
  },
  programInfo: programInfo,
  bufferInfo: sphereBufferInfo,
};
现在我们已经得到了节点,让我们来连接它们。
// connect the celetial objects
moonNode.setParent(earthNode);
earthNode.setParent(sunNode);
我们会再一次做一个对象的列表和一个要绘制的对象的列表。
var objects = [
sunNode,
earthNode,
moonNode,
];
var objectsToDraw = [
sunNode.drawInfo,
earthNode.drawInfo,
moonNode.drawInfo,
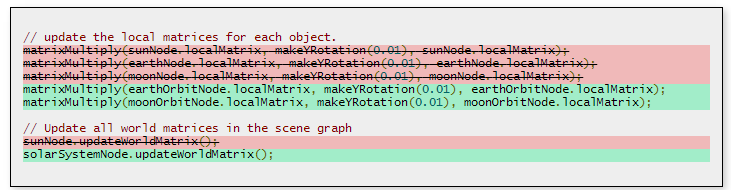
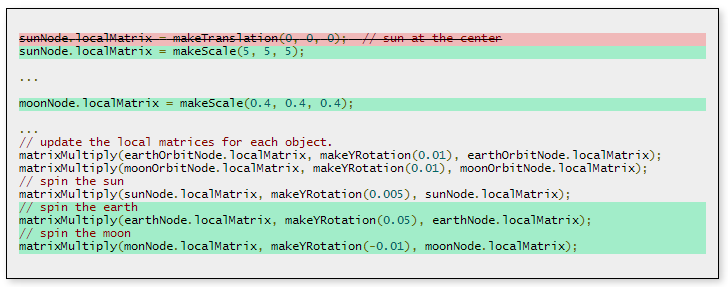
];在渲染时,我们将会通过稍微旋转它来更新每一个对象的本地矩阵。
// update the local matrices for each object.
matrixMultiply(sunNode.localMatrix, makeYRotation(0.01), sunNode.localMatrix);
matrixMultiply(earthNode.localMatrix, makeYRotation(0.01), earthNode.localMatrix);
matrixMultiply(moonNode.localMatrix, makeYRotation(0.01), moonNode.localMatrix);
现在,本地矩阵都更新了,我们会更新所有的世界矩阵。
sunNode.updateWorldMatrix();最后,我们有了世界矩阵,我们需要将它们相乘来为每个对象获取一个世界观投射矩阵。
// Compute all the matrices for rendering
objects.forEach(function(object) {
  object.drawInfo.uniforms.u_matrix = matrixMultiply(object.worldMatrix, viewProjectionMatrix);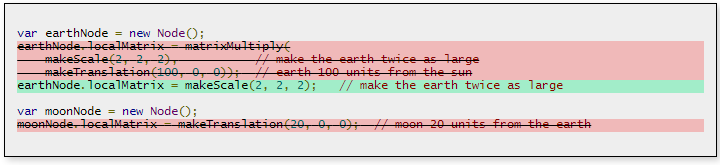
});你将会注意到所有的行星都是一样的尺寸。我们试着让地球更大点。
earthNode.localMatrix = matrixMultiply(
makeScale(2, 2, 2),   // make the earth twice as large
makeTranslation(100, 0, 0));  // earth 100 units from the sun
哦。月亮也越来越大。为了解决这个问题,我们可以手动的缩小月亮。但是一个更好的解决方法是在我们的场景图中增加更多的节点。而不仅仅是如下图所示。
  sun
   |
  earth
   |
  moon
我们将改变它为
 solarSystem
   ||
   |   sun
   |
 earthOrbit
   ||
   |  earth
   |
  moonOrbit
  |
moon这将会使地球围绕太阳系旋转,但是我们可以单独的旋转和缩放太阳,它不会影响地球。同样,地球与月球可以单独旋转。让我们给太阳系,地球轨道和月球轨道设置更多的节点。
var solarSystemNode = new Node();
var earthOrbitNode = new Node();
earthOrbitNode.localMatrix = makeTranslation(100, 0, 0);  // earth orbit 100 units from the sun
var moonOrbitNode = new Node();
moonOrbitNode.localMatrix = makeTranslation(20, 0, 0);  // moon 20 units from the earth
这些轨道距离已经从旧的节点移除
现在连接它们,如下所示
// connect the celetial objects
sunNode.setParent(solarSystemNode);
earthOrbitNode.setParent(solarSystemNode);
earthNode.setParent(earthOrbitNode);
moonOrbitNode.setParent(earthOrbitNode);
moonNode.setParent(moonOrbitNode);
同时,我们只需要更新轨道
现在你可以看到地球是两倍大小,而月球不会。
你可能还会注意到太阳和地球不再旋转到位。它们现在是无关的。
让我们调整更多的东西。
目前我们有一个 localMatrix,我们在每一帧都修改它。但是有一个问题,即在每一帧中我们数学都将收集一点错误。有许多可以解决这种被称为邻位的正常化矩阵的数学的方式,但是,甚至是它都不总是奏效。例如,让我们想象我们缩减零。让我们为一个值 x 这样做。
x = 246;   // frame #0, x = 246

scale = 1;
x = x * scale  // frame #1, x = 246

scale = 0.5;
x = x * scale  // frame #2, x = 123

scale = 0;
x = x * scale  // frame #3, x = 0

scale = 0.5;
x = x * scale  // frame #4, x = 0  OOPS!

scale = 1;
x = x * scale  // frame #5, x = 0  OOPS!
我们失去了我们的值。我们可以通过添加其他一些从其他值更新矩阵的类来解决它。让我们通过拥有一个 source 来改变 Node 的定义。如果它存在,我们会要求 source 给出我们一个本地矩阵。

现在我们来创建一个源。一个常见的源是那些提供转化,旋转和缩放的,如下所示。
var TRS = function() {
  this.translation = [0, 0, 0];
  this.rotation = [0, 0, 0];
  this.scale = [1, 1, 1];
};

TRS.prototype.getMatrix = function(dst) {
  dst = dst || new Float32Array(16);
  var t = this.translation;
  var r = this.rotation;
  var s = this.scale;

  // compute a matrix from translation, rotation, and scale
  makeTranslation(t[0], t[1], t[2], dst);
  matrixMultiply(makeXRotation(r[0]), dst, dst);
  matrixMultiply(makeYRotation(r[1]), dst, dst);
  matrixMultiply(makeZRotation(r[2]), dst, dst);
  matrixMultiply(makeScale(s[0], s[1], s[2]), dst, dst);
  return dst;
};
我们可以像下面一样使用它
// at init time making a node with a source
var someTRS  = new TRS();
var someNode = new Node(someTRS);

// at render time
someTRS.rotation[2] += elapsedTime;
现在没有问题了,因为我们每次都重新创建矩阵。
你可能会想,我没做一个太阳系,所以这样的意义何在?好吧,如果你想要去动画一个人,你可能会有一个跟下面所示一样的场景图。

为手指和脚趾添加多少关节全部取决于你。你有的关节越多,它用于计算动画的力量越多,同时它为所有的关节提供的动画数据越多。像虚拟战斗机的旧游戏大约有 15 个关节。在 2000 年代早期至中期,游戏有 30 到 70 个关节。如果你为每个手都设置关节,在每个手中至少有 20 个,所以两只手是 40 个关节。许多想要动画手的游戏都把大拇指处理为一个,其他的四个作为一个大的手指处理,以节省时间( 所有的 CPU/GPU 和艺术家的时间 )和内存。
不管怎样,这是一个我组件在一起的块人。它为上面提到的每个节点使用 TRS 源。艺术程序员和动画程序员万岁。
如果你查看一下,几乎所有的 3D 图书馆,你都会发现一个与下图类似的场景图。