ASP.NET MVC 随想录(2)——使用 Bootstrap CSS 和 HTML 元素
Bootstrap 提供了一套丰富 CSS 设置、HTML 元素以及高级的栅格系统来帮助开发人员快速布局网页。所有的 CSS 样式和 HTML 元素与移动设备优先的流式栅格系统结合,能让开发人员快速轻松的构建直观的界面并且不用担心在较小的设备上响应的具体细节。
Bootstrap 栅格(Grid)系统
在移动互联网的今天,越来越多的网站被手机设备访问,移动流量在近几年猛增。Bootstrap 提供了一套响应式、移动设备优先的流式栅格系统,随着屏幕或视口(viewport)尺寸的增加,系统会自动分为最多 12 列。
栅格参数
Bootstrap 3 提供了一系列的预定义 class 来指定列的尺寸,如下所示:

Bootstrap 栅格系统被分割为 12 列,当布局你的网页时,记住所有列的总和应该是 12。为了图示,请看如下 HTML 所示:
<div class="container">
    <div class="row">
        <div class="col-md-3" style="background-color: green;">
            <h3>green</h3>
        </div>
        <div class="col-md-6" style="background-color: red;">
            <h3>red</h3>
        </div>
        <div class="col-md-3" style="background-color: blue;">
            <h3>blue</h3>
        </div>
    </div>
</div>
注:Bootstrap 需要为页面内容和栅格系统包裹一个 .container 容器。
在上述代码中,我添加了一个 class 为 container 的 div 容器,并且包含了一个子的 div 元素 row(行)。row div 元素依次有 3 列。其中 2 列包含了 col-md-3 的 class、一列包含了 col-md-6 的 class。当他们组合在一起时,他们加起来总和是 12.但这段 HTML 代码只作用于显示器分辨率>=992 的设备。所以为了更好的响应低分辨率的设备,我们需要结合不同的 CSS 栅格 class。故添加对平板、手机、低分辨率的 PC 的支持,需要加入如下 class:
<div class="container">
    <div class="row">
        <div class="col-xs-3 col-sm-3 col-md-3" style="background-color: green;">
            <h3>green</h3>
        </div>
        <div class="col-xs-6 col-sm-6 col-md-6" style="background-color: red;">
            <h3>red</h3>
        </div>
        <div class="col-xs-3 col-sm-3 col-md-3" style="background-color: blue;">
            <h3>blue</h3>
        </div>
    </div>
</div>
Bootstrap HTML 元素
Bootstrap 已经为我们准备好了一大堆带有样式的 HTML 元素,如:
- Tables
- Buttons
- Forms
- Images
Bootstrap Tables(表格)
Bootstrap 为 HTML tables 提供了默认的样式和自定义他们布局和行为的选项。为了更好的演示,我使用精典的 Northwind 示例数据库以及如下技术:
- 用 ASP.NET MVC 来作为 Web 应用应用程序
- Bootstrap 前端框架
- Entity Framework 来作为 ORM 框架
- StructureMap 执行我们项目的依赖注入和控制反转,使用 Nuget 来安装
- AutoMapper 自动映射 Domain Model 到 View Model,使用 Nuget 来安装
打开 Visual Studio,创建一个 ASP.NET MVC 的项目,默认情况下,VS 已经为我们添加了Bootstrap 的文件。为了查看效果,按照如下的步骤去实施:
在 ASP.NET MVC 项目中的 Models 文件下添加一个 ProductViewModel
   public class ProductViewModel
    {
        public int ProductId { get; set; }
        public string ProductName { get; set; }
        public decimal? UnitPrice { get; set; }
        public int? UnitsInStock { get; set; }
        public bool Discontinued { get; set; }
        public string Status { get; set; }
    }
在 APP_Data 文件夹中添加 AutoMapperConfig 类,通过 AutoMapper,为 ProductViewModel的 Status 属性创建了一个条件映射,如果 Product 是 discontinued,那么 Status为danger;如果 UnitPrice 大于 50,则设置 Status 属性为 info;如果 UnitInStock 小于 20,那么设置 Status 为 warning。代码的逻辑如下:
Mapper.CreateMap<Product, ProductViewModel>()
.ForMember(dest => dest.Status,
opt => opt.MapFrom
(src => src.Discontinued
? "danger"
: src.UnitPrice > 50
? "info"
: src.UnitsInStock < 20 ? "warning" : ""));
添加一个 ProductController 并且创建名为 Index 的 Action
 public class ProductController : Controller
    {
        //
        // GET: /Product/
        private readonly ApplicationDbContext _context;

        public ProductController(ApplicationDbContext context)
        {
            this._context = context;
        }
        public ActionResult Index()
        {
            var products = _context.Products.Project().To<productviewmodel>().ToArray();
            return View(products);
        }
    }
上述代码使用依赖注入获取 Entity Framework DbContext 对象,Index Action 接受从数据库中返回 Products 集合然后使用 AutoMapper 映射到每一个 ProductViewModel 对象中,最后为 View 返回数据。
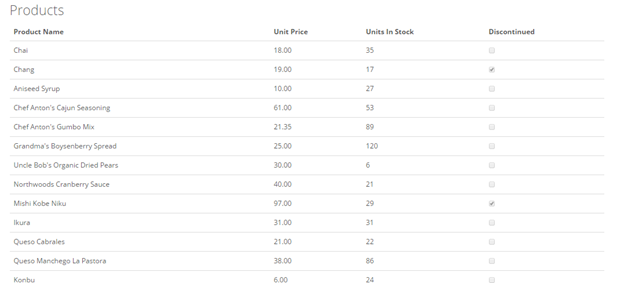
最后,在视图上使用 Bootstrap HTML table 来显示数据
<div class="container">
<h3>Products</h3>
<table class="table">
    <thead>
        <tr>
            <th>
                Product Name
            </th>
            <th>
                Unit Price
            </th>
            <th>
                Units In Stock
            </th>
            <th>
                Discontinued
            </th>
        </tr>
    </thead>
    <tbody>
        @foreach (var item in Model)
        {
            <tr>
                <td>
                    @Html.DisplayFor(modelItem => item.ProductName)
                </td>
                <td>
                    @Html.DisplayFor(modelItem => item.UnitPrice)
                </td>
                <td>
                    @Html.DisplayFor(modelItem => item.UnitsInStock)
                </td>
                <td>
                    @Html.DisplayFor(modelItem => item.Discontinued)
                </td>
            </tr>
        }
    </tbody>
</table>
</div>
呈现的数据如下所示:
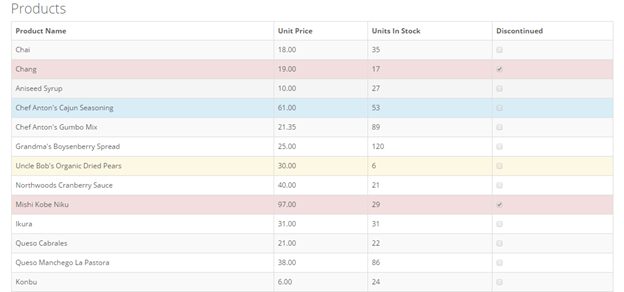
Bootstrap Tables 其余样式
Bootstrap 提供了额外的样式来修饰 table。比如使用 table-bordered 来显示边框, table-striped 显示奇偶数行间颜色不同(斑马条纹状),table-hover 顾名思义,当鼠标移动行时高亮,通过添加 .table-condensed 类可以让表格更加紧凑,单元格中的内补(padding)均会减半,修改后的代码如下所示:
<table class="table table-bordered table-striped table-hover">
</table>
显示的效果如下:

Bootstrap上下文 Table 样式
Bootstrap 提供了额外的 class 能让我们修饰和的样式,提供的 class 如下:
- Active
- Success
- Info
- Warning
- Danger
修改上述代码,为动态添加样式:
@foreach (var item in Model)
{
<tr class="@item.Status">
    <td>
        @Html.DisplayFor(modelItem => item.ProductName)
    </td>
    <td>
        @Html.DisplayFor(modelItem => item.UnitPrice)
    </td>
    <td>
        @Html.DisplayFor(modelItem => item.UnitsInStock)
    </td>
    <td>
        @Html.DisplayFor(modelItem => item.Discontinued)
    </td>
</tr>
}
更新过后的效果如下所示:
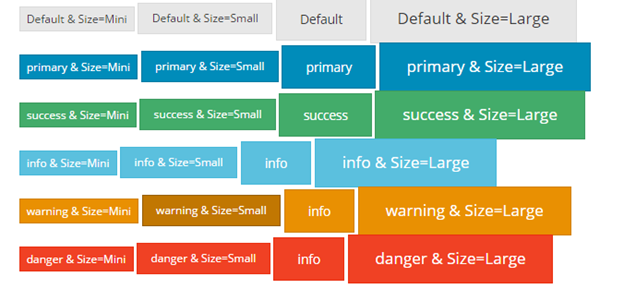
Bootstrap Buttons
Bootstrap 提供了许多各种不同颜色和大小的 buttons,为核心的 buttons 提供 6 种颜色和 4 种尺寸可以选择,同样通过设置 class 属性来显示不同的风格:
• btn btn-primary btn-xs
• btn btn-default btn-sm
• btn btn-default
• btn btn-sucess btn-lg
可以为 Button 设置颜色的 class:
• btn-default
• btn-primary
• btn-success
• btn-info
• btn-warning
• btn-danger
所以可以使用如下代码来呈现效果:
<div class="row">
<!-- default按钮 -->
<button type="button" class="btn btn-default btn-xs">
Default & Size=Mini
</button>
<button type="button" class="btn btn-default btn-sm">
Default & Size=Small
</button>
<button type="button" class="btn btn-default">Default</button>
<button type="button" class="btn btn-default btn-lg">
Default & Size=Large
</button>
</div>显示效果如下:
Bootstrap Form(表单)
表单常见于大多数业务应用程序里,因此统一的样式有助于提高用户体验,Bootstrap 提供了许多不同的 CSS 样式来美化表单。
使用 ASP.NET MVC 的 HTML.BeginForm 可以方便的创建一个表单,通过为