第三章 Rails 中的视图
课程概要:
本课程讲解Rails 视图(View),内容包括常用的辅助方法(Helper),如何使用表单(Form),AJAX在视图中的应用以及如何借助其他的模板引擎实现简洁的页面方案。
知识点:
- 布局
- 辅助方法
- 表单
- AJAX
- 模板引擎
课程背景
视图(View)即 MVC 中的 V,也是Rails使用者最先见到的部分。在完成业务逻辑前,合理的设计视图是 MVC 开发中最先得到用户认可的部分。本课程结合商品页面的开发,讲解Rails 中的视图。
3.1 布局和辅助方法
概要:
本课时讲解Rails 视图(View)中的布局文件,常见的辅助方法(Helper)以及如何使用局部模板。
知识点:
- 布局(layout)
- 辅助方法(helper)
- 局部模板(partial)
正文
3.1.1 布局(layout)
本章开始,我们将进入 Rails 的视图(view) 的开发中。如果你对 Rails 这个 MVC 框架还有一些模糊的话,建议读一读这篇文章。
Rails 是一个 RESTful 风格的 MVC 框架。
我们把第一章使用 bootswatch 创建的项目 copy 过来。现在,我们进入到 app/views 这个文件夹吧。
layouts 里放的是布局文件。如果我们网站只有一种布局,那么一个 application.html.erb 就足够了。我们也可以为每个资源创建一个 layout,比如 app/views/layouts/products.html.erb。
我们删掉多余的代码,增加一个 yield 的辅助方法(helper)。
 <div class="container">
   <%= yield %>
</div>访问我们的页面,希望你会看到和我一样的效果。如果没有,没关系,可以到 这里 clone 我们的代码。
yield 方法可以让 Rails 使用我们的模板(template) app/views/products/index.html.erb 填充了布局(layout)。
我们再看一下 app/views/layouts/application.html.erb 中的这一行:
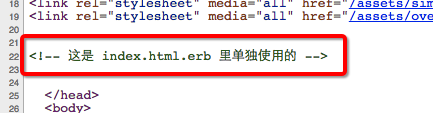
<%= yield(:page_stylesheet) if content_for?(:page_stylesheet) %>如果我们在 app/views/products/index.html.erb 中使用 content_for 方法,可以在这个layout 的这个位置,显示额外的内容,比如,我们在 index.html.erb 的最上面增加:
 <%= content_for :page_stylesheet do %>
 <!-- 这是 index.html.erb 里单独使用的 -->
<% end %>再刷新下页面,我们在源码里看到:
在实践开发里,我们经常这样做:布局中加载的是所有页面通用的内容和 css,js,而到了具体页面,就通过 content_for 这个辅助方法定义自己的内容,在我们的 application.html.erb 里,你可以找到四个 content_for,这样给我们的代码里增加了一些灵活,也不必把所有内容都写到一起。
content_for? 判断我们是否定义了这个变量。
如果我们想更改一下布局,该如何做呢?实践中,我们的确会遇到以下几种情形:
情形一:admin 要使用自己的布局文件 app/views/layouts/admin.html.erb
我们在 admin 的 controller 里声明它使用另一个:
class AdminController < ApplicationController
  layout "admin"
通常我们把 admin 放到 module 中,而为 admin 建立一个通用的 controller,让所有 admin 的 controller 都继承它,这样,我们不用反复的去定义了:
class Admin::BaseController < ApplicationController
  layout "admin"
end

class Admin::ProductsController < Admin::BaseController
end

class Admin::CommentsController < Admin::BaseController
end
情形二:为完成某个特殊操作,我们需要更改布局。
这时,我们要在 action 里去变更这个布局,比如,创建一个 Product 的时候:
def new
  @product = Product.new
  render layout: "another_layout"
end
情形三:不用布局
def edit
  render layout: false
end
3.1.2 常用的辅助方法(helper)
上一节,我们已经使用了几个辅助方法,这里我们再介绍几个 Layouts and Rendering in Rails 提到的 helper。
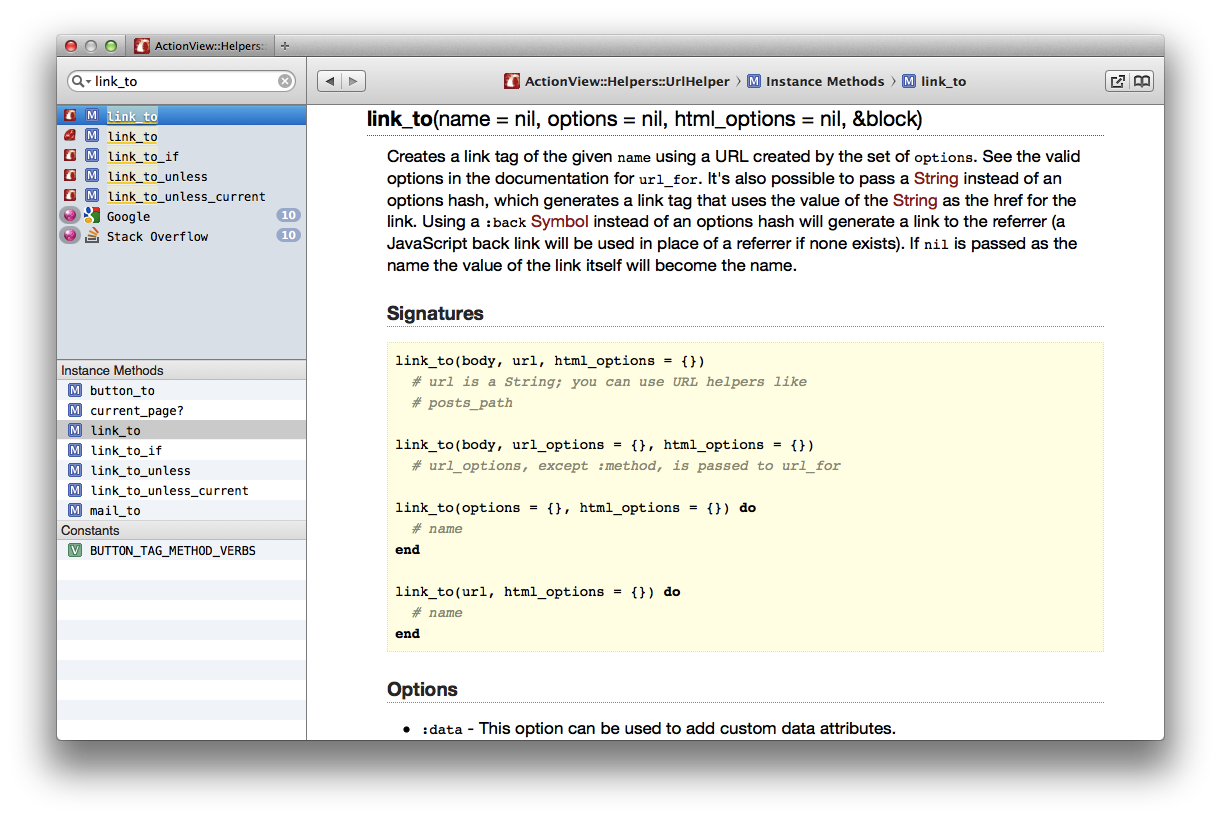
link_to
你会发现在页面里最多的是 link_to 这个方法,它的参数也是蛮多的,我们来详细讲解。
我们把现在的 view 修改一下,把 首页 的链接加上。
<%= link_to "网店演示", root_path, class: "navbar-brand" %>一个稍复杂的例子:
<%= link_to "删除", product, :method => :delete, :data => { :confirm => "点击确定继续" }, :class => 'btn btn-danger btn-xs' %>我们可以改变 link_to 的默认行为(GET),:method => :delete 将发送 delete 请求。:confirm 将会告诉浏览器阻止我们当前的动作,直到点击 确定。实现上面两个效果,需要引入 ujs, 在我们的 app/assets/javascripts/simplex.js[1] 中已经为我们引入了:
//= require jquery
//= require jquery_ujs
注[1]:通常我们使用的是 application.js,但是在 1.3 中我们设计了新的主题,目前我使用的是 simplex。
写到这里,我要推荐 http://api.rubyonrails.org/ 这里了,对于各种 Rails 本身的方法,我们可以通过查询 api 文档得到。如果是某个 Gem 提供的方法,我们可以直接翻看它的 README 或者代码。
一个较实用的工具 Dash,可以帮你管理每个版本 api 文档,查询起来也很方便。不过它是收费的。
image_tag
建议你使用 api 文档查找一下这方法,你会看到这个代码提示:
image_tag("icon")
# => <img alt="Icon" src="/assets/icon" />
image_tag("icon.png")
# => <img alt="Icon" src="/assets/icon.png" />
image_tag("icon.png", size: "16x10", alt: "Edit Entry")
# => <img src="/assets/icon.png" width="16" height="10" alt="Edit Entry" />
image_tag("/icons/icon.gif", size: "16")
# => <img src="/icons/icon.gif" width="16" height="16" alt="Icon" />
image_tag("/icons/icon.gif", height: '32', width: '32')
# => <img alt="Icon" height="32" src="/icons/icon.gif" width="32" />
image_tag("/icons/icon.gif", class: "menu_icon")
# => <img alt="Icon" class="menu_icon" src="/icons/icon.gif" />
我们的图片是来自 app/assets/images 的,我放了一个 logo.png 在里面,你会发现它的地址是:http://localhost:3000/assets/logo-be2e3e66a18126c4042f84cd4aae4cb3.png。Rails 使用 sprockets-rails 来管理 app/assets 中的文件,后面章节我们会详细介绍。
这里,我们可以关闭 be2e3e66a18126c4042f84cd4aae4cb3这种形式:
config/environments/development.rb
config.assets.digest = false重启我们的服务,地址变为 http://localhost:3000/assets/logo.png。
auto_discovery_link_tag
我们经常在 head 里和页面里,增加 rss 和 atom 订阅连接,这时,我们可以使用 auto_discovery_link_tag 这个辅助方法。
<head>
...
<%= auto_discovery_link_tag(:rss, {controller: "products", action: "index"}, {title: "RSS Feed"}) %>
<%= auto_discovery_link_tag(:atom, {controller: "products", action: "index"}, {title: "ATOM Feed"}) %>
...
</head>
我们也可以在页面中增加这个连接,这在 web2.0 兴起后的博客中很常见,方便我们把数据加入到订阅中。
<%= link_to "rss", products_url(format: "rss") %>
<%= link_to "atom", products_url(format: "atom") %>
剩下的问题是, Rails 如何提供这个数据,我并不想等到 controller 里再去讲这个部分,让我们现在开始了解下:
Rails 是会根据我们的请求类型,做出响应。
如果我们请求的是一个 http://localhost:3000/products.html,Rails 会给我们 html 的页面,而如果我们请求的是 http://localhost:3000/products.rss,Rails 会自动选择 rss 的模板,渲染(render)后返回我们结果。http://localhost:3000/products.atom 也是一样。 所以,我们在 app/views/products/ 中增加两个文件:index.rss.builder 和 index.atom.builder。
在 controller 里,如果我们想对结果做一些其他的操作,就需要增加这个代码:
app/controllers/products_controller.rb
respond_to do |format|
  format.html
  format.rss { ... }
  format.atom { ... }
end
在这个例子中,我们并不需要改变什么,所以不用添加它。
app/views/products/index.atom.builder
atom_feed do |feed|
  feed.title "商品列表"
  feed.updated @products.maximum(:updated_at)

  @products.each do |product|
    feed.entry product, published: product.updated_at do |entry|
      entry.title product.name
      entry.content product.description
      entry.price product.price
    end
  end
end
app/views/products/index.rss.builder
xml.instruct! :xml, version: "1.0"
xml.rss version: "2.0" do
  xml.channel do
    xml.title "商品列表"
    xml.description "这是商品列表"
    xml.link products_url

    @products.each do |product|
      xml.item do
        xml.title product.name
        xml.description product.description
        xml.price product.price
        xml.link product_url(product)
        xml.guid product_url(product)
      end
    end
  end
end
再次访问 http://localhost:3000/products.rss 和 http://localhost:3000/products.atom,你会发现我们得到了结果。
我们用到了 .builder 这个结尾的文件,它会告诉 Rails 使用 Builder::XmlMarkup 这个库(lib)来解析文件。所以看 rss.builder,它是按照 xml 格式写的。atom.builder 用到了另一个辅助方法 atom_feed,写法虽然不同,但是生成的内容也是 xml 格式的。
在 scaffold 创建的文件里,你会看到 index.json.jbuilder,它会使用 JBuilder 这个库来解析并生成 json 的结果。这会在后面的章节讲到,你可以在 这里 先了解一下。
Railscasts.com 是所有 Rails 学习者必看的网站,这个 视频 一定会帮助你理解上面的内容。
在此,向 Ryan 致敬。
stylesheet_link_tag
<head>
<%= stylesheet_link_tag "simplex", :media => "all" %>
</head>
css 文件的引用通常放到页面的 head 标签之间。这里我们引用的是 css 文件,我们也可以把它改为 .css.scss,这样可以在里面写一些 scss 语法,而不用更改我们的引用。我们在 2.1.3 中已经提到了 scss。
javascript_include_tag
...
<%= javascript_include_tag "simplex" %>
<%= yield(:page_javascript) if content_for?(:page_javascript) %>
</body>
浏览器是自上而下解析节点元素(DOM)的,所以,请注意我们把 js 文件加载放到页面最下面,以免因为某个 js 解析问题导致页面始终无法显示。在引用完 js 库后,我们还可以根据需要,单独放置页面的 :page_javascript。
ActionView 还为我们提供了其他很多辅助方法,可以查看 这里。
3.1.3 局部模板(partial)
DRY, Don't Repeat Yourself.不要重复自己。
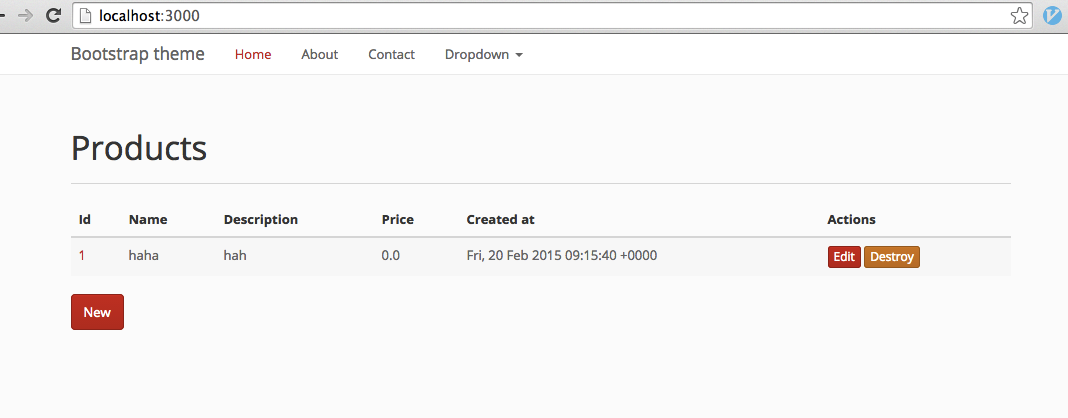
为了让我们节省更多的页面重复代码,我们还可以使用局部模板(partial)。打开我们的 app/views/products/index.html.erb:
<% @products.each do |product| %>
  <%= render partial: "product", locals: { product: product } %>
<% end %>这里我们使用了局部模板,partial 指定了使用哪个模板,locals 向模板里传递了一个变量。在 _product.html.erb 里,我们显示具体 product 的信息。
不过这是一个老套的写法,Rails 4 给了我们更酷的写法:
<%= render @products %>不过,如果需要传递更多的变量(locals),还是要用第一种方法,当然,你完全可以把 each do 的代码放到局部模板里。
我们也可以不传递变量到局部模板里,它可以找到 @products,看一下 new.html.erb 和 edit.html.erb:
<%= render :partial => 'form' %>也可以直接写:
<%= render 'form' %>如果我们在页面加载路径中,放置了多个同名的局部模板,它会显示离它最近的那个。我们可以把公用较多的模板,放到一个专属的文件夹里,比如 shared,引用的时候:
<%= render partial: "shared/product", locals: { product: product } %>注:当使用 locals 传递参数时,一定要声明 partial。
我为大家在 shared 中放置了一个同样的 _product.html.erb,大家可以在 index.html.erb 中调用看看。
说一个实践中经常用到的局部模板。
我建立了一个新的文件夹 application,这里会放布局文件使用的局部模板,我放了一个 _flash.html.erb,这是 flash 通知。看看我们的 products_controller.rb,我们在操作成功后会有提示信息,它在我们的页面上还没有显示。我修改了一下 application.html.erb:
 <div class="container">
   <%= render "flash" %>
   <%= yield %>
   ...
为了让 flash 符合 bootstrap 的格式,我做了代码调整,大家可以参考代码。flash 是 session 的应用,通常在 controller 的 action 间传递信息,读取成功后自动清空。如果一个 flash 没有在合适得地方读出来,那么它将被保存到读出为止,这会造成本不该显示它的地方却显示它,所以我把 flash 放到了 layout 中,使得所有页面都会引用它,保证它产生后立刻显示,并在显示后自动清空。